Notes on Photography
Bottom Belay: How to provide an effective bottom belay
How to provide an effective bottom belay
One of most basic canyoneering tasks is to provide a safety backup, known as a "belay" to a fellow team member while the team member is rappelling down. In case the team member looses control while rappelling down, the belay will prevent the team member from falling down. There are several ways to provide a belay, the "bottom belay" also known as the "fireman's belay" is one of the simplest and most commonly used. It is simple, but in order to be effective and safe, you need to pay attention to the finer points on how to handle the rappelling rope, and your stance while providing the bottom belay.
The Effective Bottom Belay
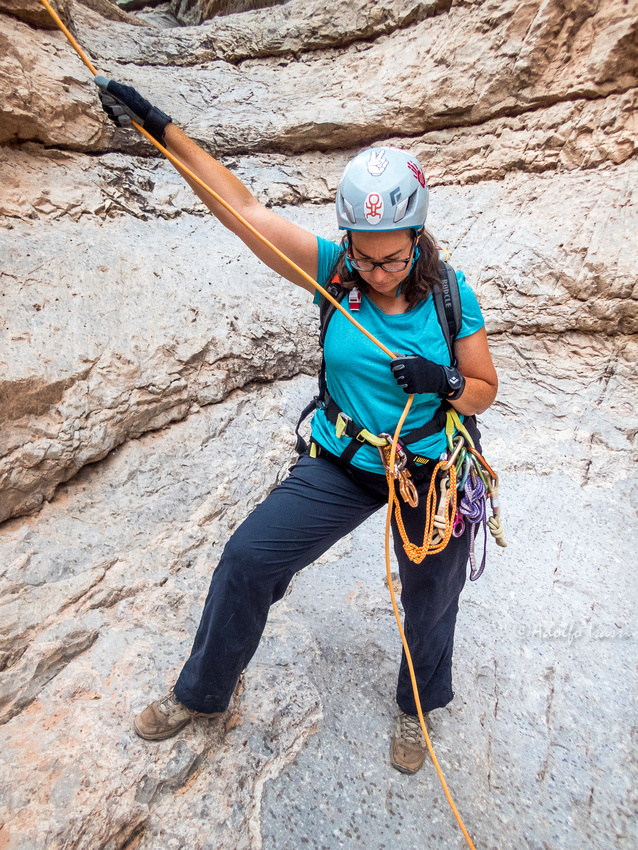
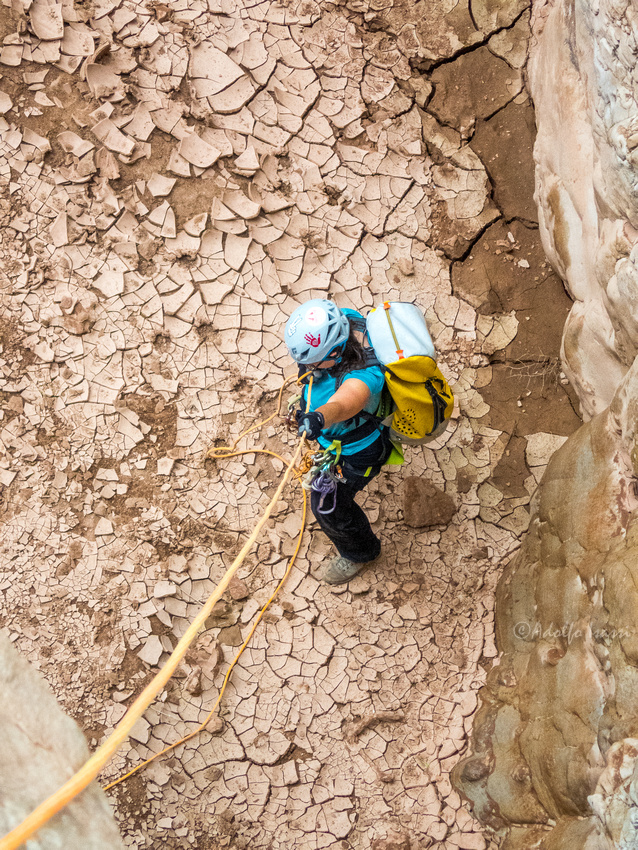
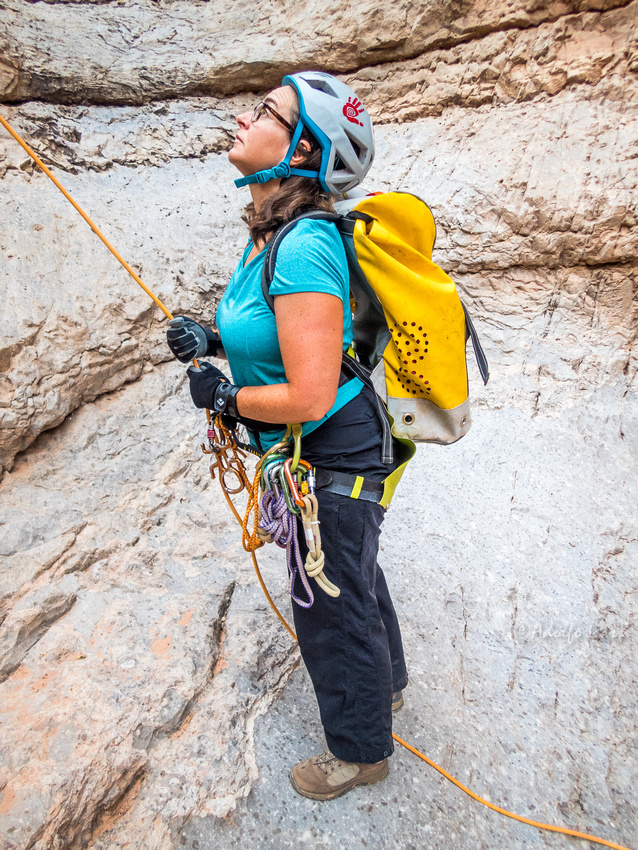
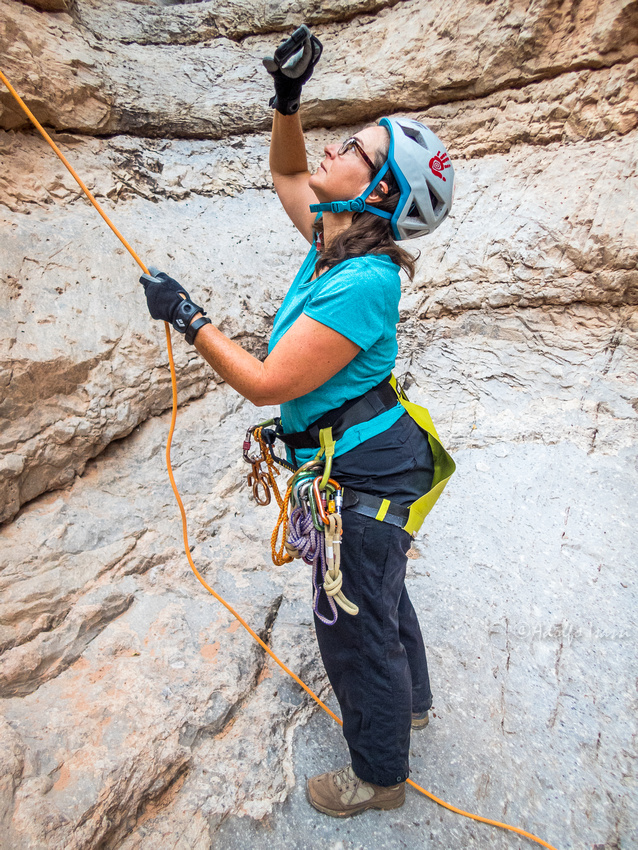
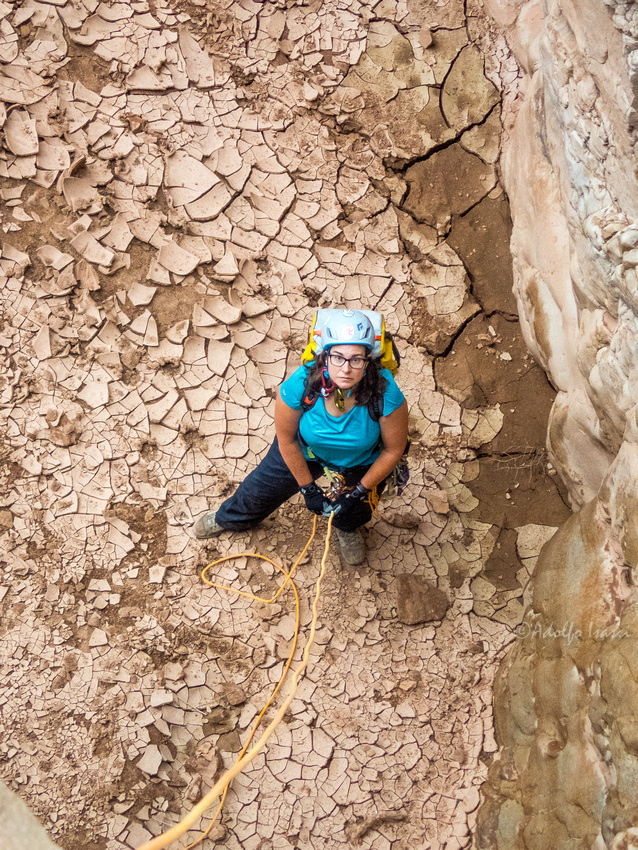
Stand side ways to the wall to minimize exposure to falling debris. Keep your head down to use your helmet as head protection. One arm high, and the other arm at chest level
****
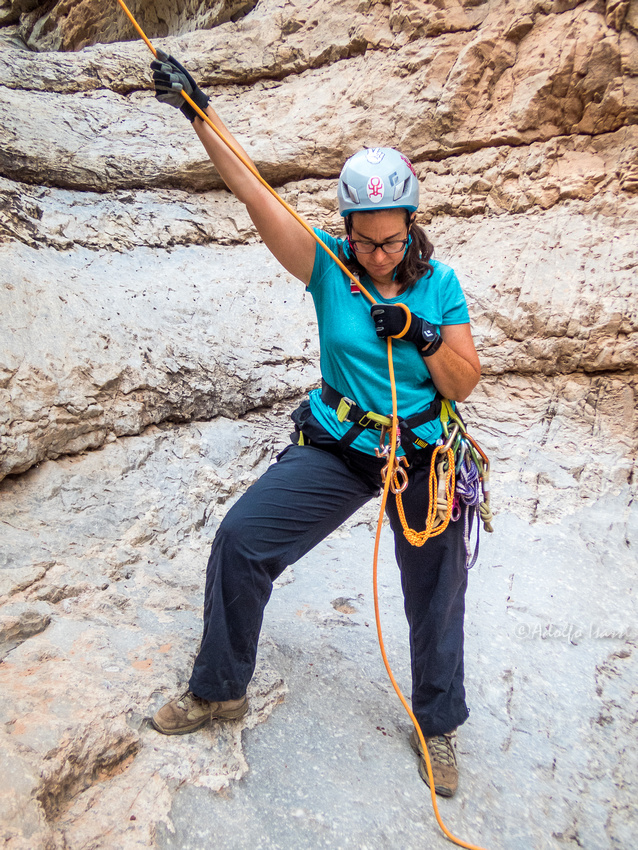
Put a wrap around the hand at chest level
***
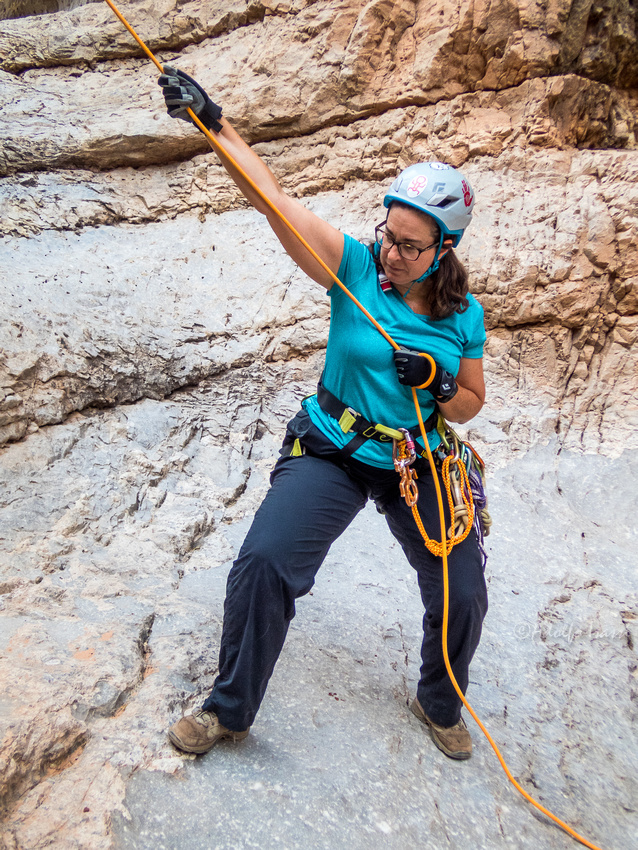
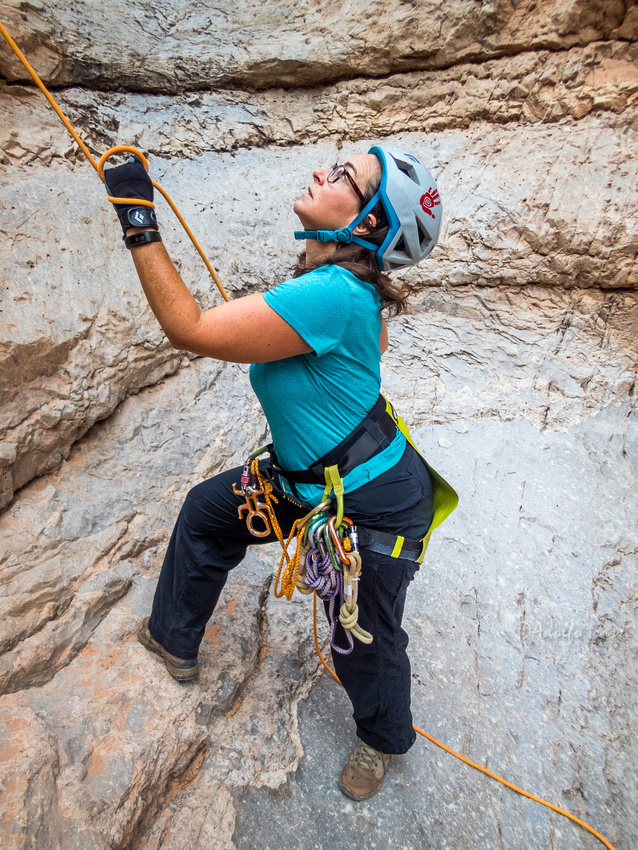
If a belay is needed, your team mate should alert the bottom belayer by shouting "tension!" Person on bottom belay immediately provides tension to stop the rappeller by flexing the knees and dropping center of gravity
***
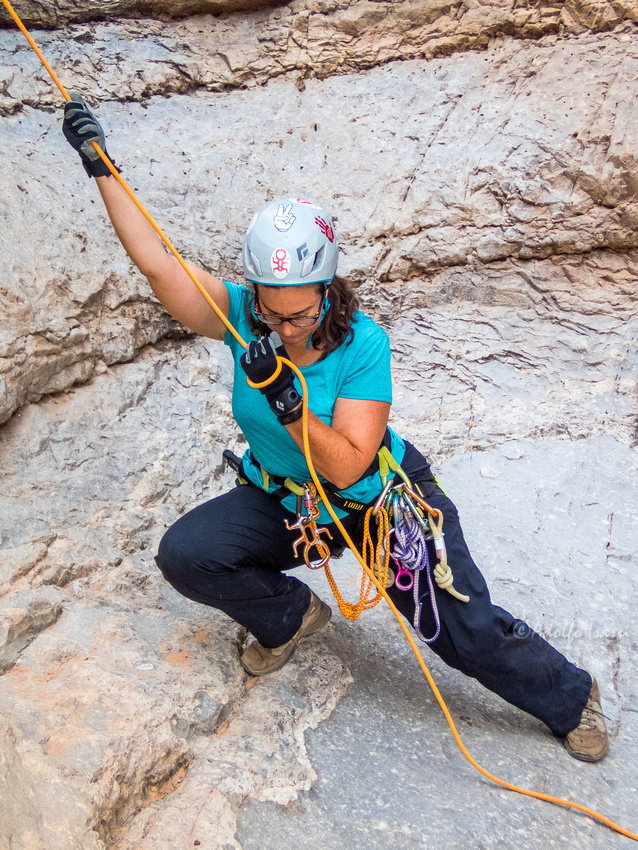
Stopping rappeller by tensionning rope from the bottom
***
How an effective belay looks from the top.
***
How not to belay from the bottom
Wrong way. Body and face are fully exposed to falling debris. Hands and arms are not ready to effectively provide rope tension
***
Nope. Useless belay
***
Body and face fully exposed. Wrap is on the wrong hand.
***
How a wrong belay looks from the top. Body and face fully exposed, hands and arms not ready to put tension on rope
Twin-Rope-Systems
Twin Rope Systems
Twin rope systems are types of rappel rigging that offer 2 independent and isolated strands of rope available to rappel down to facilitate and move large groups of people down faster. While one person is rappelling down, another person is rigging her/his descender.
There are 2 types of Twin Rope Systems:
-
Static
- Rappeler can not be lowered in case of emergency. A "conversion to lower" needs to take place in case of emergency
-
Releasable / Contingency
- Rappeler can be lowered immediately in case of emergency
Static Twin Rope Systems
"Stone Block"
"Clipped Clove Hitch"
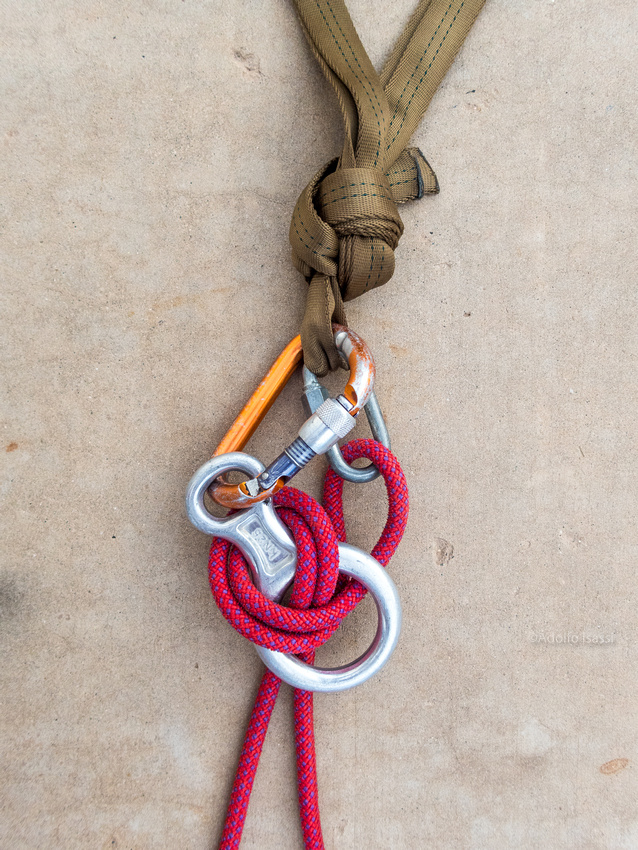
"Stone 8"
Releasable/Contingency Twin Rope Systems
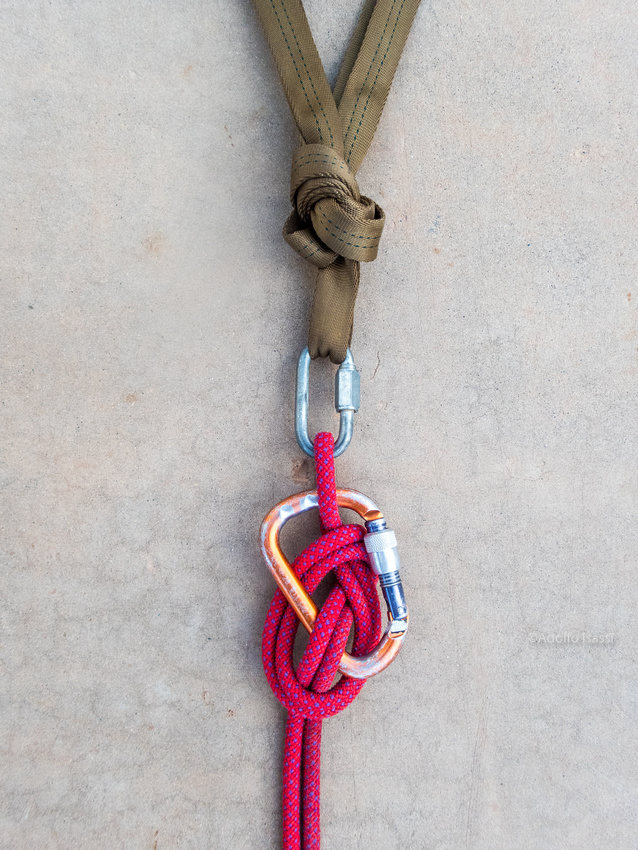
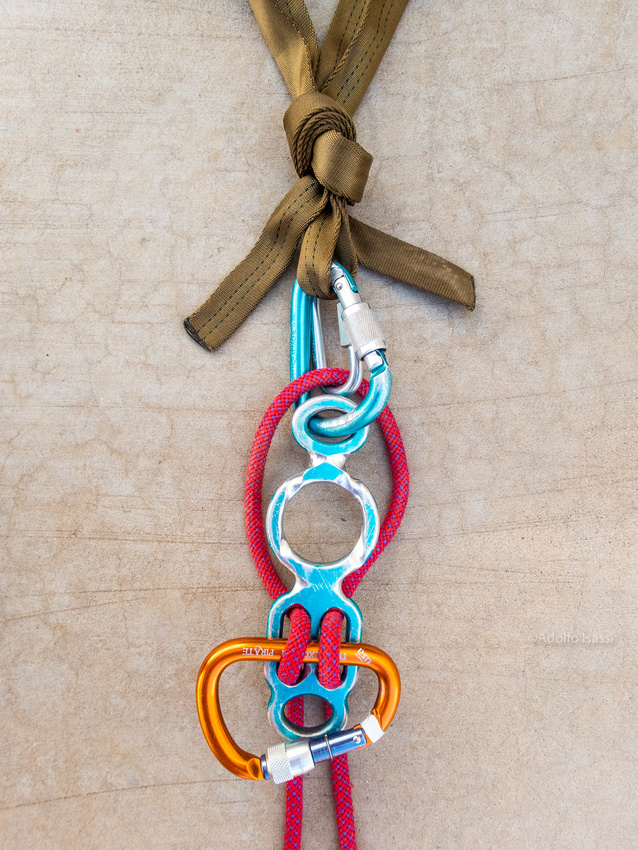
"8 Joker"
(if rope is thin, 8 rigging may need wraps around the tails)
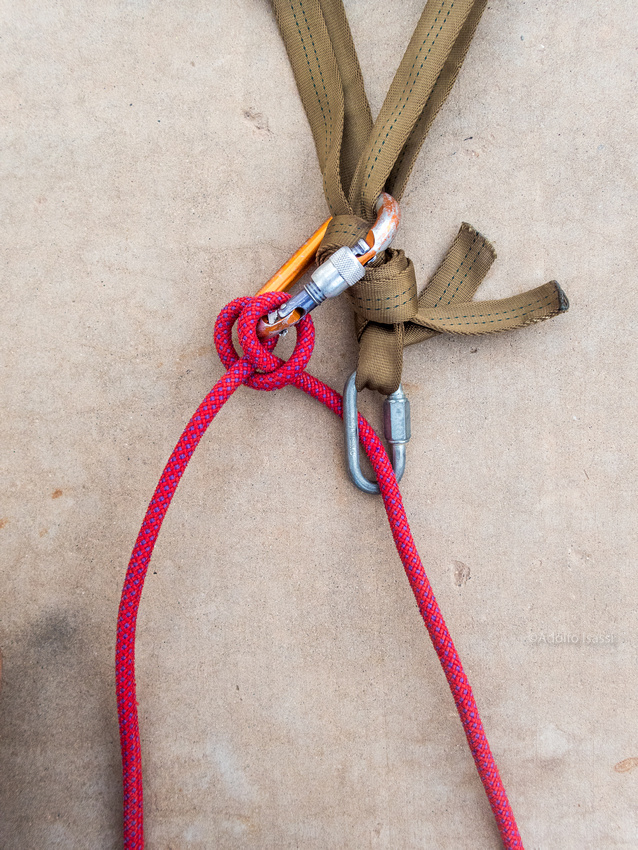
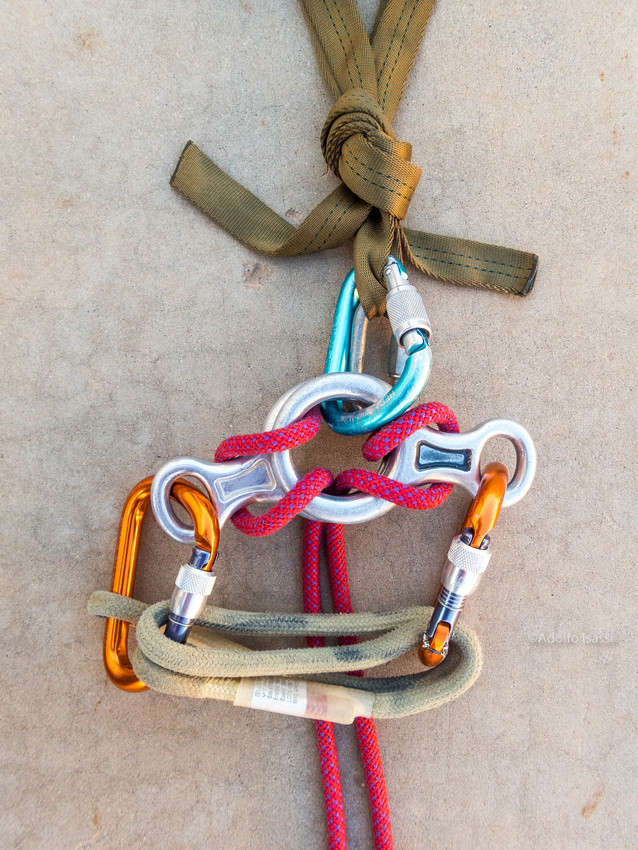
"Totem Joker"
(if rope is thin, rigging may need wraps around the tails)
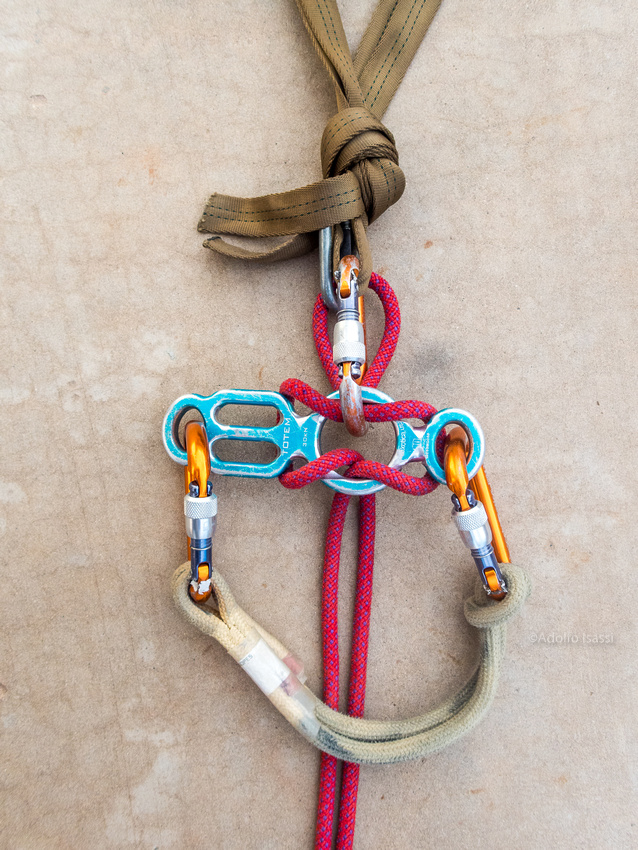
"Totem Jester"
(if rope is thin, plate rigging may need slip knots)
For Totem haters....
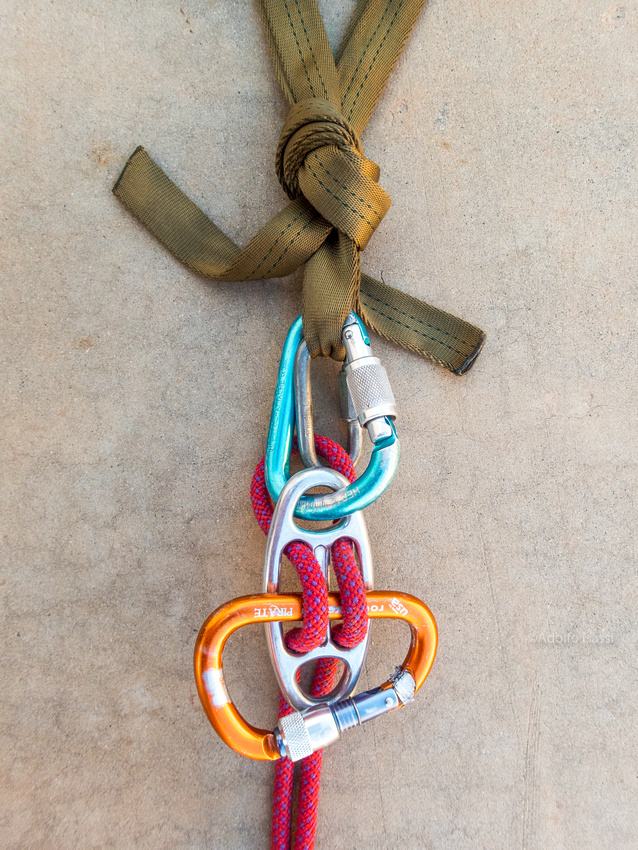
"Gigi Jester"
(if rope is thin, plate rigging may need slip knots)
art-of-canyoneering-inspired-gear-rack
Art of Canyoneering Inspired Gear Rack

The journey from thrifty canyoneering to over-geared canyoneering, and back
-O-
"Art of Canyoneering" is the first class that I took some years ago from Rich Carlson with the American Canyoneering Academy (ACA). Canyoneering is inherently a dangerous sport. This class aimed at giving you the knowledge to identify the risks and the tools to manage and minimize them.
Selecting and acquiring gear for canyoneering seems to be a hit and miss process. Lots of choices on the market, constant evolution of available gear, intersected with personal preferences, advise from instructors, friends, videos and....blogs! :)
There seems to be a range of types of canyoneers when it comes to gear choices:
On one end of the spectrum, the "Thrifty Canyoneer":
Some canyoneers are not only reluctant to purchase costly gear but also want to get by with a minimal amount of gear through canyons. I've seen some very skilled and experienced canyoneers perform technical tasks in canyons with minimal gear. These skilled canyoneers are not thrifty canyoneers. They carry plenty of gear, they just know how to perform tasks when gear is lost, broken, or forgotten. The actual Thrifty Canyoneers do not know yet the value of owning gear that is needed in case of emergency, or they hope that others bring such gear. I started as a thrifty canyoneer, trying to do canyons with my rock-climbing gear, and nothing else.
On the other end of the spectrum, the "Over-geared Canyoneer":
The canyoneer that has an over abundance of gear hanging from the harness, and he or she gets through the canyon without using it because some of it is not necessary. I myself, moved from a thrifty canyoneer to an over-geared canyonner, trying to match a piece of gear for every possible eventuality.
Finding a balance is an evolving process:
In all fairness, I think that there is a natural progression curve in which people start as thrifty canyoneers and move towards over-geared canyoneers, and finally dial down their gear to a personal, reasonable middle point.
Knowing what gear works best for you, what gear to bring depending on the canyon ACA rating, and what rescue techniques may be necessary in case of a mishap, takes training, experience, and willingness to experiment with different gear. It is a process that at some point feels like an art.
The Art of Canyoneering class approach was to let you choose your tools while exposing you to a range of choices, underlining that the important aspect, was not the particular tool or piece of gear, but the principle behind the usage and application of it. I've seen other more prescribed and dogmatic approaches towards gear selection, which makes teaching a simpler, faster process. Not sure what way is best. I guess as long as you know how to perform the necessary tasks safely and with a reasonable range of available tools, it's OK.
On the pragmatic side of canyoneering, let's face it, some of the routes out there are brutal, you do not want to carry extra gear that is not useful, and you want it to be as light as possible. Art of Canyoneering focused on how to select gear that could perform several functions on its own or combined with other pieces of gear: Multifunction gear.
This is the backstory behind my current canyoneering gear rack. I think is still evolving, as my skills evolve, I engage different type of canyons and gear choices also change and evolve.
As part of the ACA, sometimes I engage in leading canyons or practice sessions, and gear issues or questions come around. So I will go through my current gear and see if the selection behind it helps you in the selection of yours.
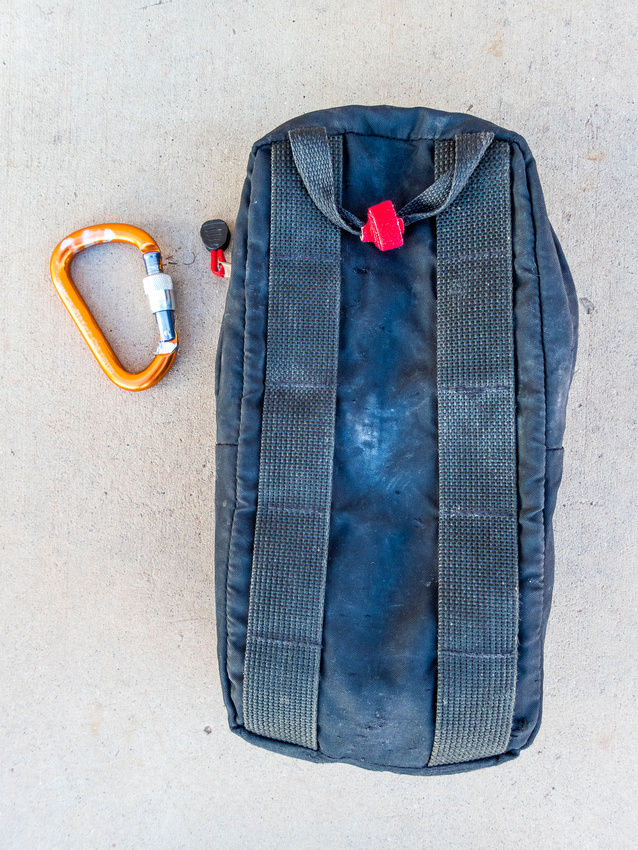
Everything that you will see in the next photographs, fits in this bag. This bag uses a fraction of my 45L standard canyoneering bag , and leaves room for a wetsuit, harness, helmet, up to 300' of 8mm rope, First Aid Kit, water, and food. Sometimes, this includes a small packraft. So, the point is, this bag size is not an issue. Even in small skinny canyons, this bag will fit in a 15L bag with all gear required for such a canyon. The bag is organized in a way where the items that are used the least, are at the bottom, and the items that are used the most, are at the top.
Bag from Top to Bottom
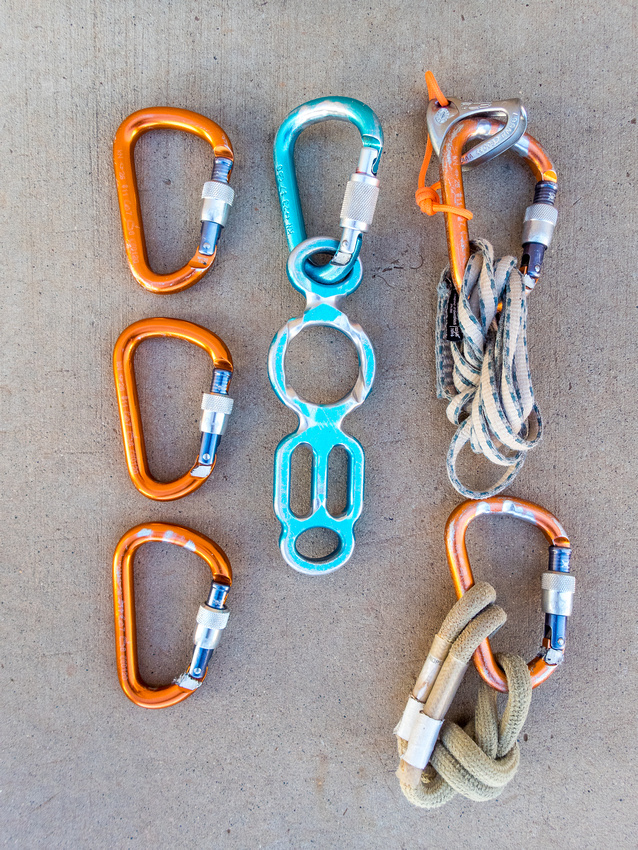
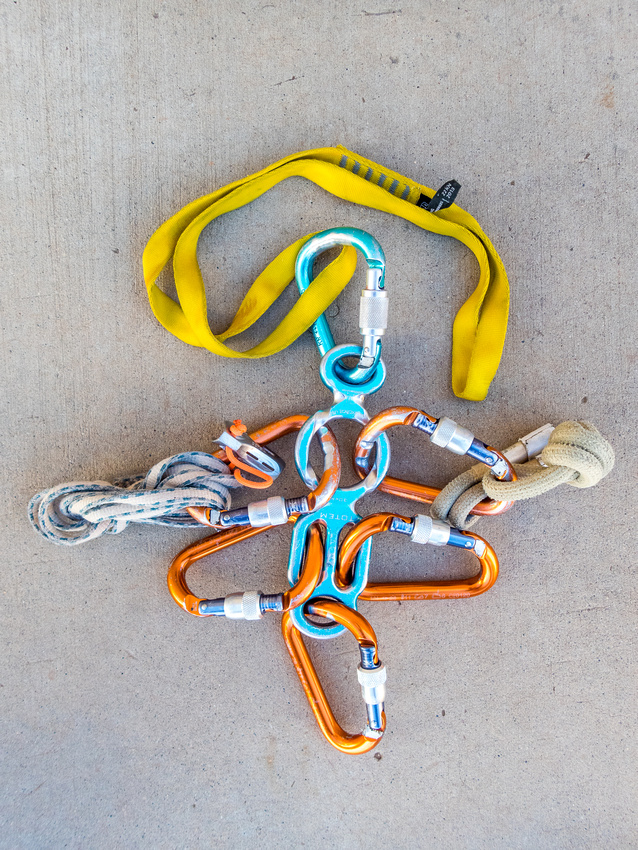
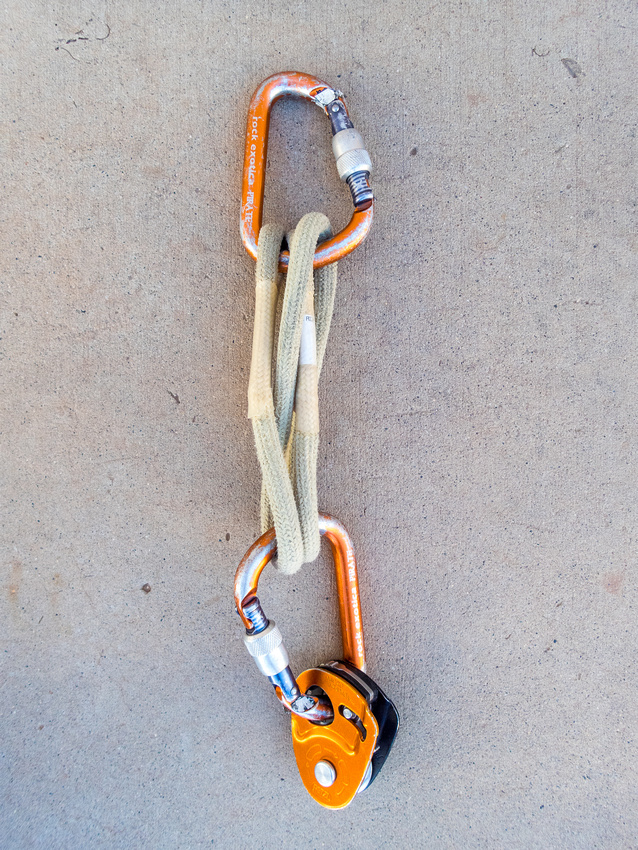
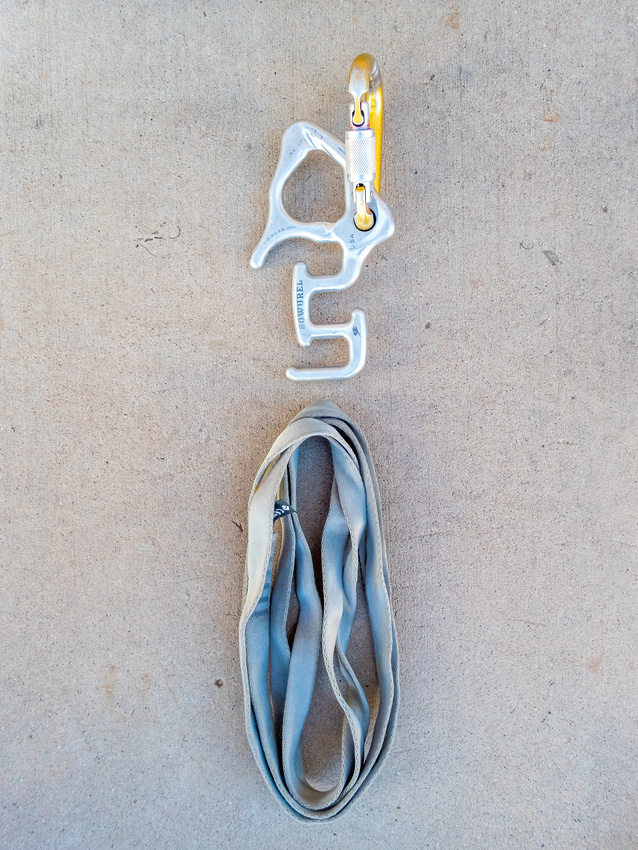
I call this, the "Totem Rack". It is at the top of the bag, and is the first thing that I pull racked like this:
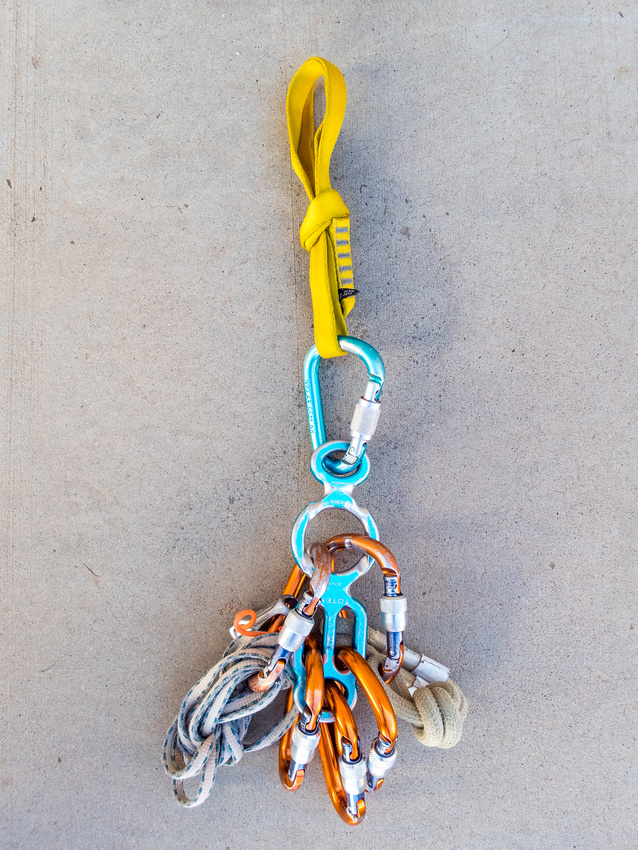
With what you see in this photo, you can:
- Rappel single or double stranded
- Rappel with a self-belay above, or below the rappel device.
- Rappel double without twisting the ropes, to have a clean pull.
- Rig static single or twin rope systems
- Rig contingency/releasable single or twin systems
- Rig Rig contingency/releasable single or twin systems + a top-rope belay
- Convert to haul on the fly
- Rappel down and pass a knot
- Rig a guided-rappel
- Perform basic self-rescue
- Ascend rope
- Ascent a tensioned tope
- Descend a tensioned rope
- Perform rescue conversion from static to lower on single rope, double rope or "tails up".
- Install a Dead-Man-Switch
- Install a Canyon-Quick-Draw
- Install a retrievable safety line
- Rap pack hanging and leave your safety tether free for self-rescue.
- Perform rescue pick-off with up to 3:1 mechanical advantage
Next gear out of the bag in case I need to:
- ascend a long way (Microtraxion)
- ascend and pass a lip on the rock, or a knot in the rope
- perform a rescue by converting to a haul system
- haul with mechanical advantage up to 5:1 complex (combined with initial base gear)
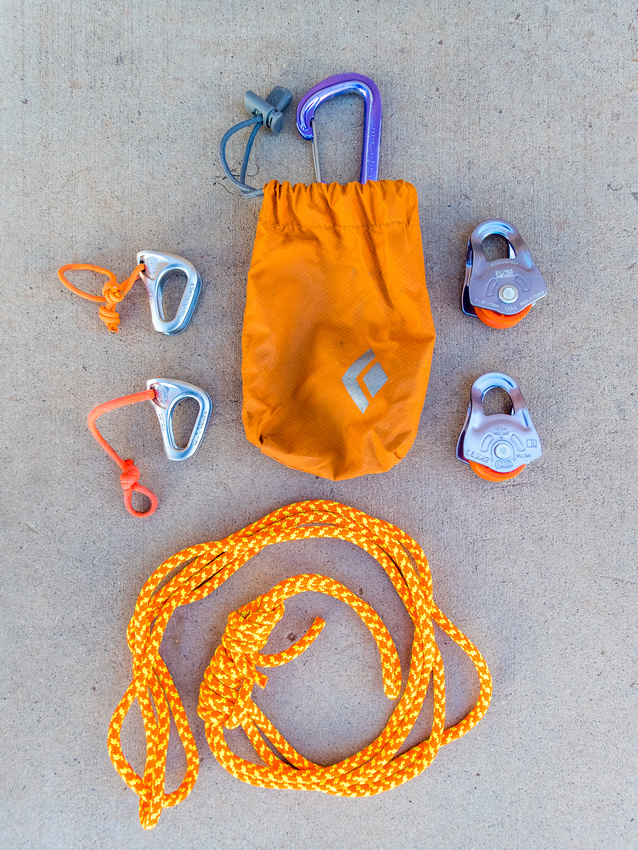
Next gear out of the bag in case I need:
- to install a mechanical advantage in a haul system that exceeds a 5:1 complex
- install a system to tension rope that requires self-minding pulleys to protect the rope sheath.
- to perform a rescue Pick-Off where I may need 5:1 mechanical advantage
- a foot loop that cinches on my foot (long Purcell Prusik. Sometimes a shorter version in my harness as a safety tether)
Bottom of the bag:
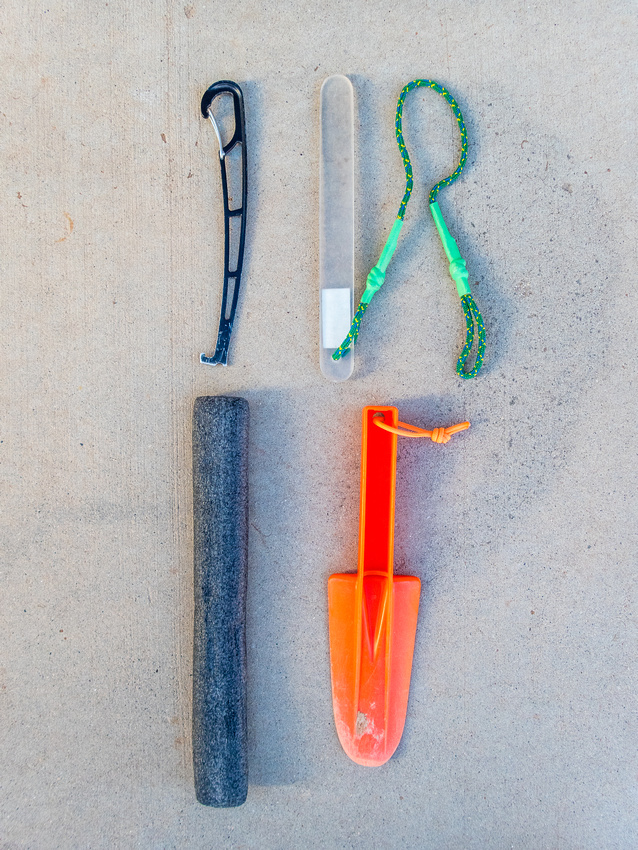
Anchor building bits:
- A crack cleaning/nut tool to clean cracks and pinch points. That tool can also check bolt heads. This tool can be used also to loosen tight knots after heavy loading.
- A "fiddle stick" for emergencies (like running out of webbing), very tricky rope pulls. Not an every day tool for me.
- A piece of pipe insulation for rope-edge-protection
- A shovel to dig dead-man anchors and fill potshots or sand-traps.
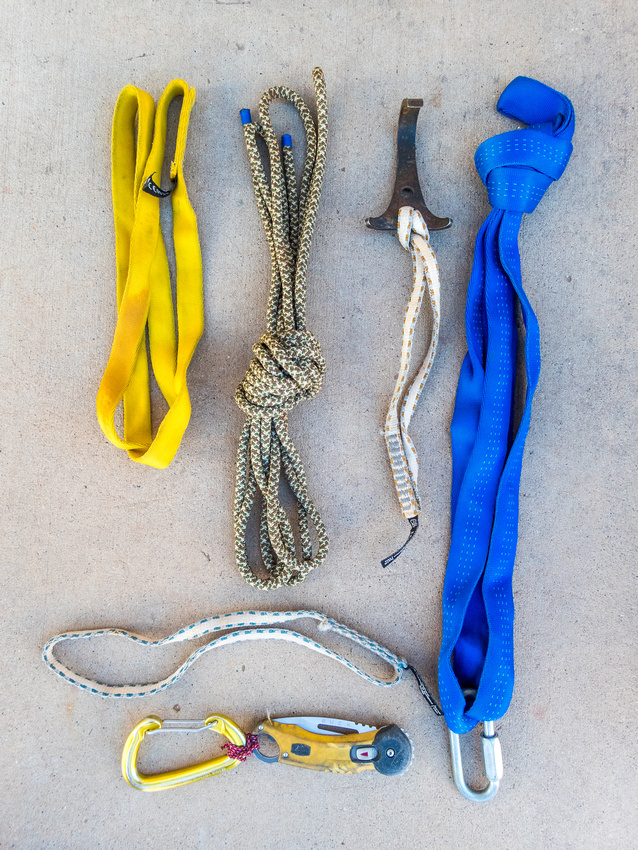
Rigging odds and ends that help.
- Webbing and rapide to build a "piggy back anchor" sometimes helpful is rescue scenarios
- Grappler hook for drops where LAMR was meat anchor (rarely used, but has saved me a couple of times)
- Short runners to extend master points in rigging scenarios.
- Accessory cord for more rescue tricks, repairs, emergencies
- Self locking knife for hard to cut webbing, cord, rope (I have a Trilobite EEZYCUT on my harness)
Depending on the particular canyon:
For 200+ overhang rappels on a skinny 8mm rope, I switch to a rack-inspired rappel device with which I can fine tune friction on the fly. Sometimes a double runner to rig a chest harness if needed.
Some notes:
The gear depicted in this post, is my personal selection and not an advertisement on the brands. The gear selection also reflects the type of canyons that I descend often in the American Southwest. The important concept is that the gear that you select, performs the often needed canyoneering tasks, the emergency canyoneering tasks, in the type of canyons that you descent.
Sleekens Landscape Presets & Brushes Review
I was approached by Sleeklens to review some of their products for landscape photography. After some research, I agreed to take their Adobe Lightroom "Presets & Brushes" for a test drive and review them.
Installing Sleeklens Lightroom presets was a breeze. Just unzip the package, and copy the presets to your Lightroom catalog "Develop Presets" folder and "Local Adjustments Presets" folder. The instructions are here:
How to install Lightroom Presets
How to install Lightroom Brushes
Sleeklens offers photography packages for Adobe Photoshop and Lightroom. I use both, but through the years, I've been sidelining Photoshop more and more and switching to RAW editors. I started years ago with CaptureOne, and eventually settled on Lightroom. There is plenty to write about the benefits of RAW shooting and the benefits of Lightroom. That could be a lengthy post, but during my review, I realized that these two aspects, Shooting RAW and Lightroom are relevant to the benefits of Sleeklens, and how to use its presets:
Benefits of Lightroom and Sleeklens:
One of the key benefits of Lightroom is that it is a "non-destructive editor": Non-destructive editing is a form of audio, video, or image editing where the original content is not modified in the course of editing. So, no matter how many edits or corrections are done on the photograph, they can be reverted, re-applied, or . . . saved independently of the original photograph! So they can be re-used on other similar photographs. Saving one, or a number of, edits into applicable actions is what Lightroom calls Presets. And what Sleeklens offers for Lightroom is a list of presets ready to be applied to your photographs.
Lightroom comes already with some basic Presets, and you can use your own edits to create and save your own presets. So why get Sleeklens presets?
To answer this question, let me jump first to point out another benefit of Lightroom: Great photography technical knowledge is embedded in the way the Lightroom user interface is designed and organized, particularly the Develop Module.
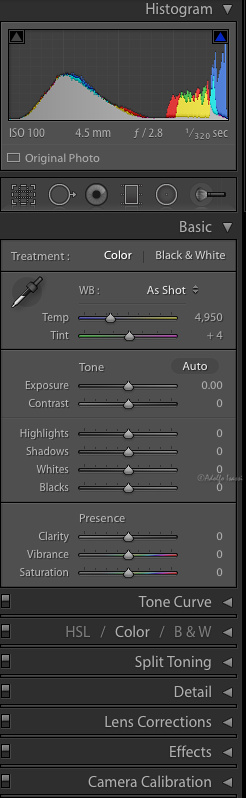
Develop Module
It is no accident that in the Develop Module the first thing to set/edit is the White Balance setting. This is the setting that will lay the foundation for the color and mood of the image. Next is all the Exposure related settings (exposure, contrast, shadows, whites, blacks). As you move top to bottom on the Develop Panel, you move from the basic settings to the finishing touches.
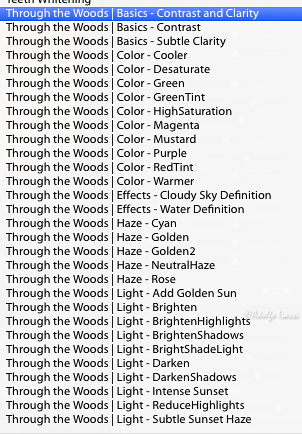
The Sleeklens Bundles present the same benefit: They have a great deal of image editing knowledge embedded in their Presets and Brushes. And its Landscape "Through the Woods" bundle is organized the same way: Base edits, to finishing touches.
What you need to know about RAW and Sleeklens:
The RAW file that a digital camera produces is akin to a film Negative that needs to be developed. Lightroom is one of the "dark rooms" that you can use to develop and print your "negatives." The key aspects of RAW shooting is the freedom to play with key specific camera settings in post production while minimizing pixel loss or degradation due to camera sensor native file format conversion to something else like JPG, TIFF, PNG, etc.
This technical aspect of digital photography is relevant to Sleeklens Presets because these presets do not alter certain aspects of RAW files. Most noticeable White Balance. I shoot with Canon, Nikon, and Olympus RAW capable cameras, and Sleeklens landscape presets do not alter CR2, NEF, or ORF white balance and other of these file settings. So, for example, when a "Warm It Up" preset is applied, Sleeklens uses "Tone & Tint" (Split Toning on shadows and highlights) to achieve a warmer overall color temperature.
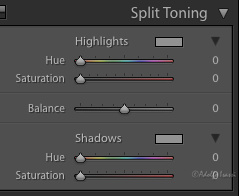
This is perfectly fine. You just need to be aware of this, so you make a judgment call and apply your desired white balance before, or after a Sleeklens preset.
Hands on Sleeklens:
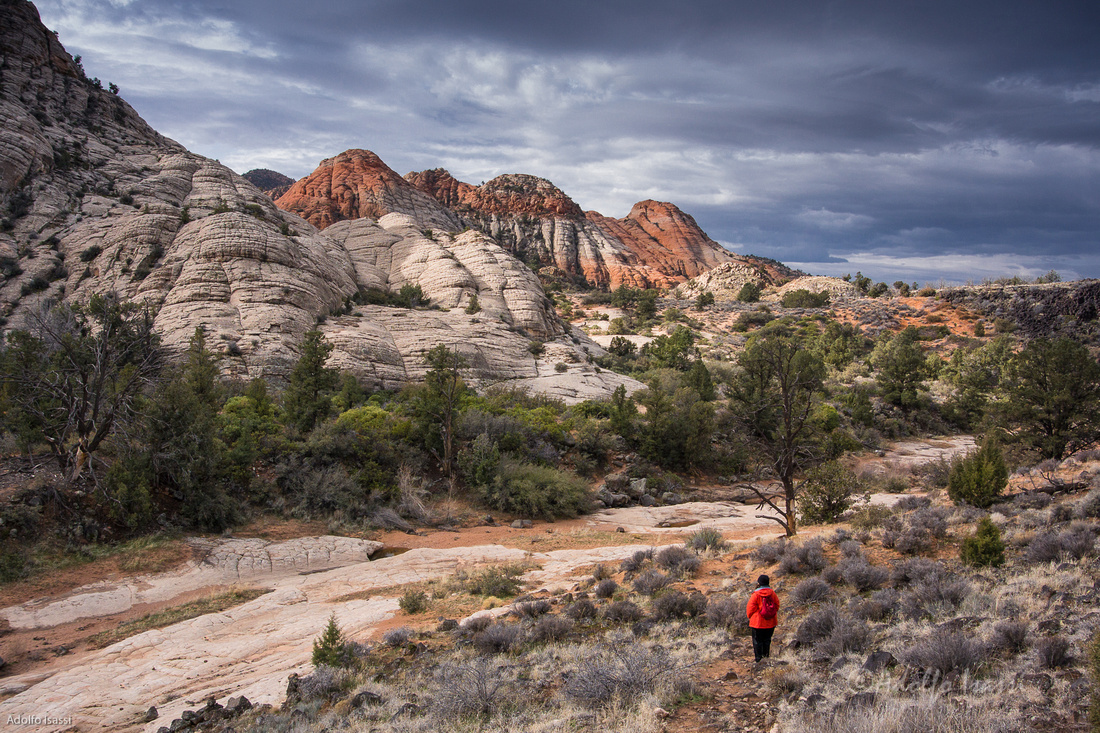
After installation and watching these video tutorials, I decided to select some recent RAW files that present some of the most common post-production landscape photography challenges:
- Bland and flat image due to overcast sky light
- Underexposed foreground due to high contrast scene with bright sky.
Bland and flat image due to overcast sky light
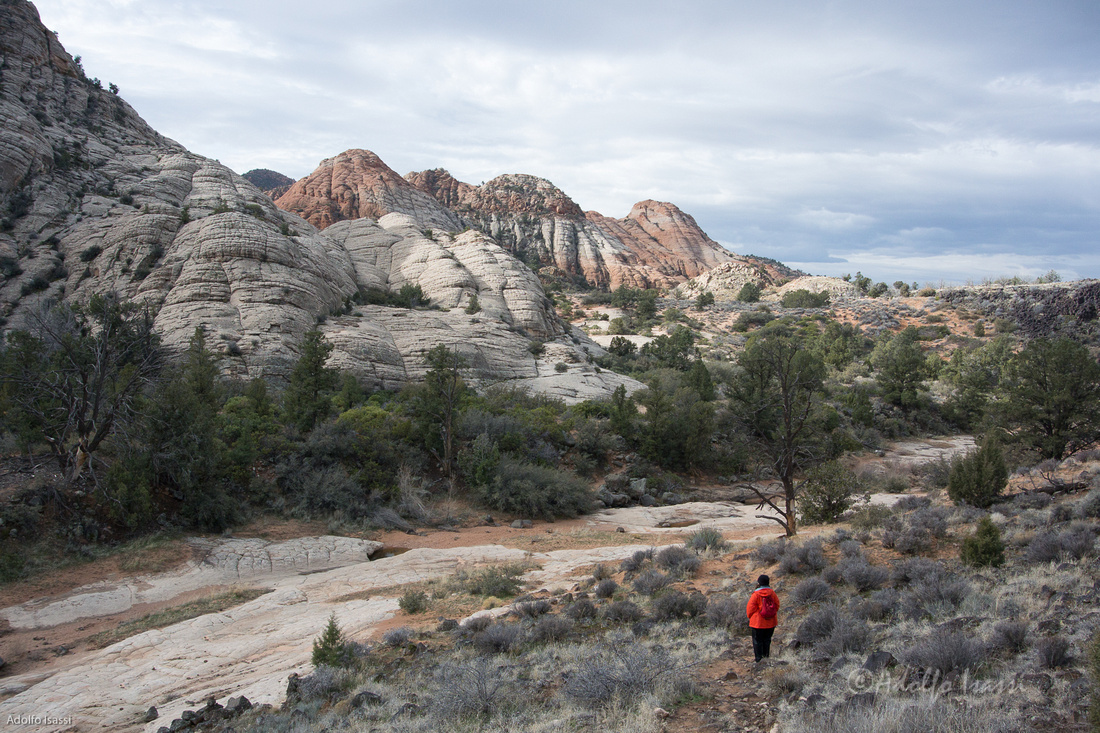
This is the original RAW file undeveloped
This is the developed RAW file with my usual workflow

This is the Sleeklens result after applying:
Base Punchy, Exposure Darken, Exposure Darken Shadows, Color Pop, Warm it up.
Right after applying these Sleeklens presets, I manually adjusted the contrast down to bring the image closer to the result of my usual workflow.
As you read the name of the applied Sleeklens presets, you can make sense of how the image is getting developed and refined.
Underexposed foreground due to high contrast scene with bright sky
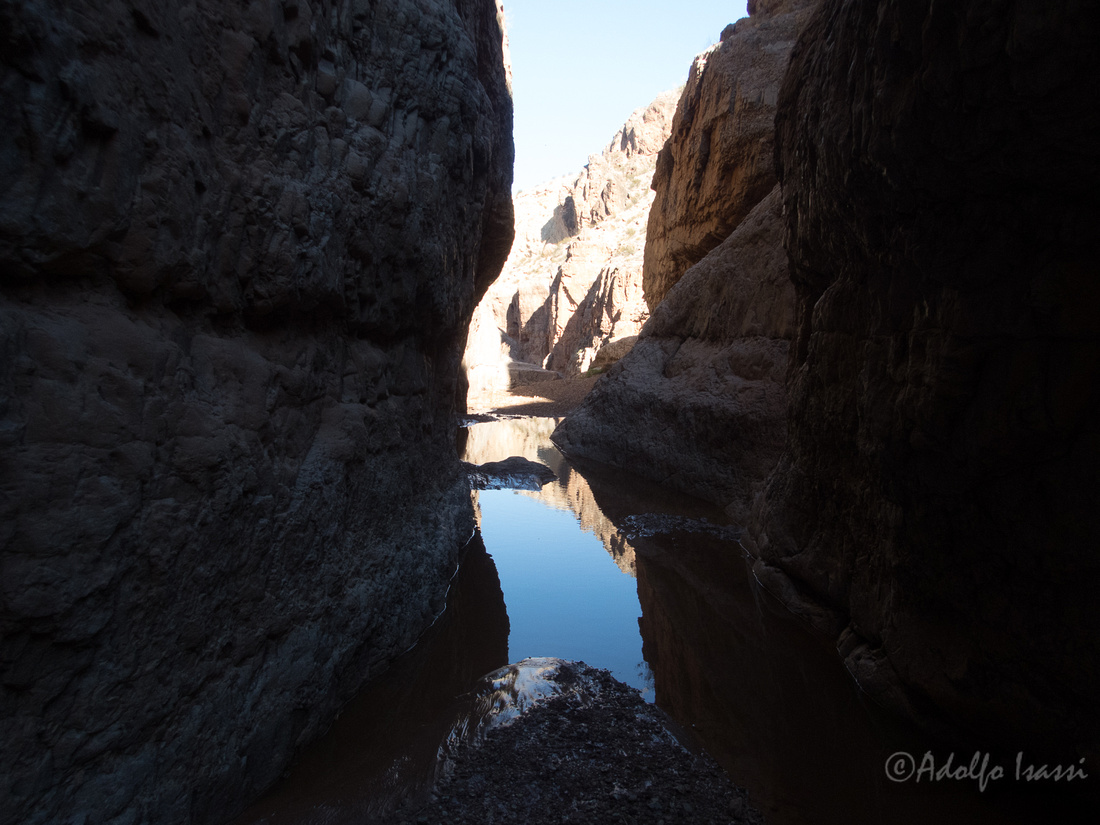 Here is the original undeveloped RAW file. You can always recover dark shadows, but you cannot recover overexposed, washed out skies. Knowing this, when you want to capture a high contrast scene, you need to expose for the sky and compensate exposure to pull out shadows out of total black. When the exposure difference between sky and shade is too much, usually more than 5 exposure stops, you will need to resort to some techniques like: Graduated Filters, Multiple Exposure Blending, One RAW Multiple Develop Blends, Tone Mapping Software, etc.
Some of these techniques are labor intensive and prone to contrived looking results. This particular problem, extending the dynamic range of an image has been the panacea of software tools in the last ten years or so. Now days, this is commonly referred as HDR (High Dynamic Range).
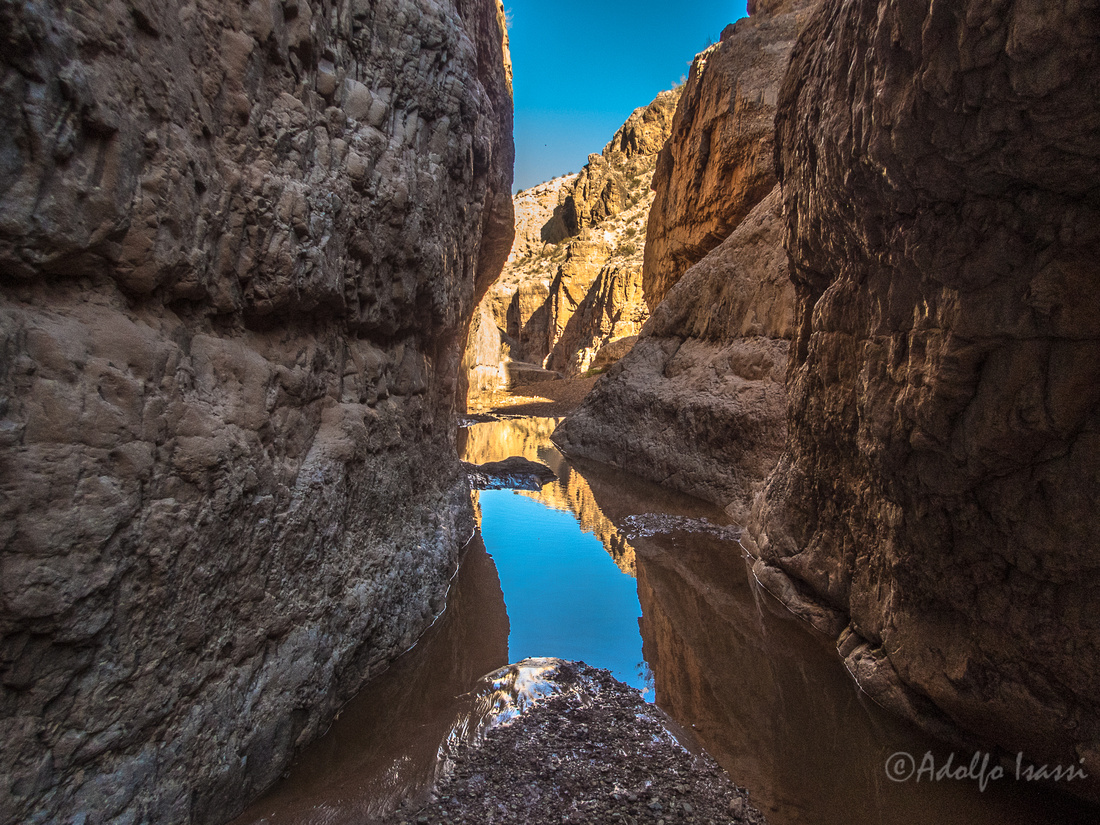
Here is the developed image by manually wrangling the shadows out, while keeping the sky under control. This was a time consuming process.
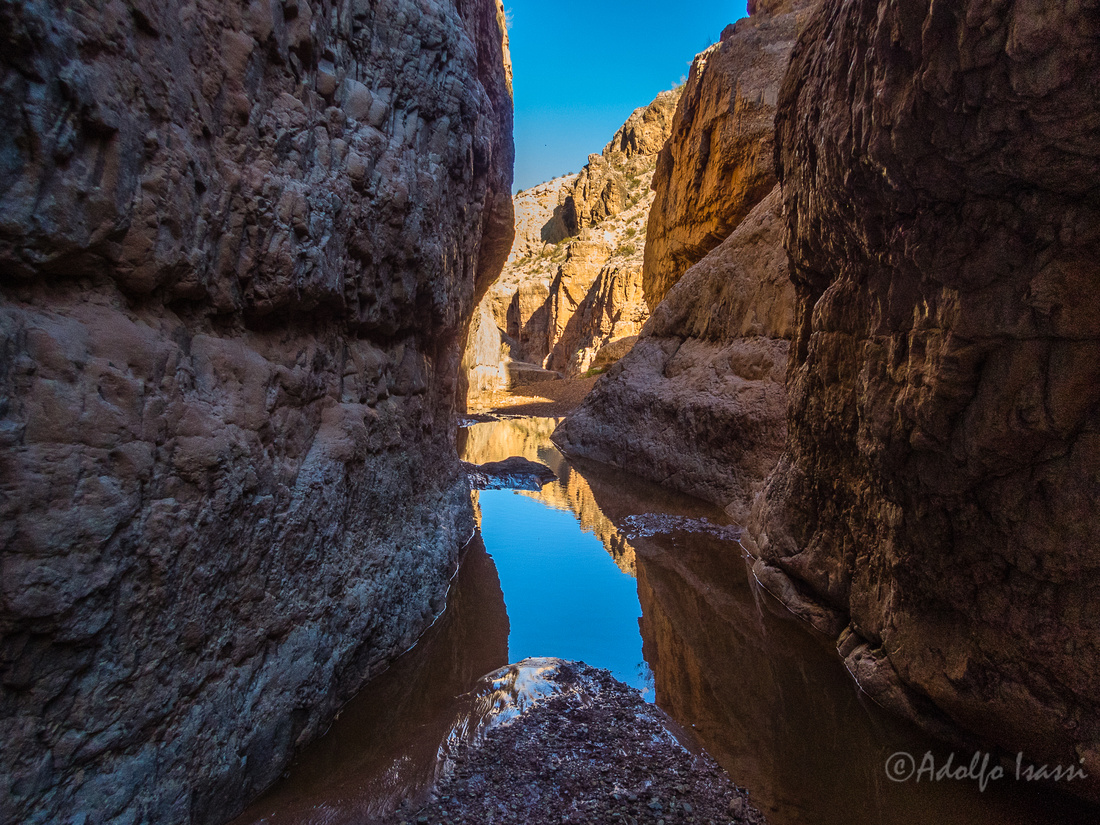
Here is the Sleeklens result after applying:
Base High Dynamic Range
This was for sure a "wow" moment to see a single preset getting a very similar result, yet saving me quite a bit of time. The rock has a blue cast, but here is where the Sleeklens brushes come in handy to apply small area corrections.
Sleeklens Brushes:
Similar to Lightroom Presets, at the top of the Develop Module, Lightroom has a set of "Local Adjustment Tools." One of these tools is the Brush where you can apply an array of corrections to a small area.
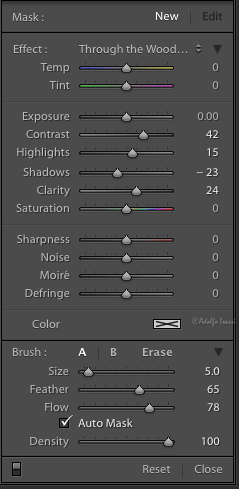
These Sleeklens Brushes also pack a lot of knowledge, and the names are intuitive and easy to understand:
Conclusion:
I really liked the basic concept of adding value by extending Adobe Lightroom's existing framework. The installation will not alter dramatically your existing Lightroom catalogs, and all the Presets and Brushes follow the same behaviors as all other Lightroom edits: Non-destructive, adjustable, reversible, stackable.
It looks like for both seasoned photographers, or beginners, Sleeklens will save time and teach you a thing or two while you work on your files.
You can check:
The Sleeklens landscape bundle here
Their professional editing services here
And the rest of the presets bundles here
Action Cameras: Ion Air Pro first impressions
Ion Air Pro first impressions
Through the years, I've been resisting the lure to use video. During a long trip in 2010, I tried to use video as a way to document the conditions surrounding the endeavor of landscape photography. I think that effort was a failure. Lack of focus, too long clips, etc. I think I learned what not to do.
With my involvement in canyoneering, video re-surfaced as an attractive medium to document canyon descents. Photography cannot capture the whole experience. This time, I decided to leverage my photographer background and treat it as linked photographs: Framing & Panning.
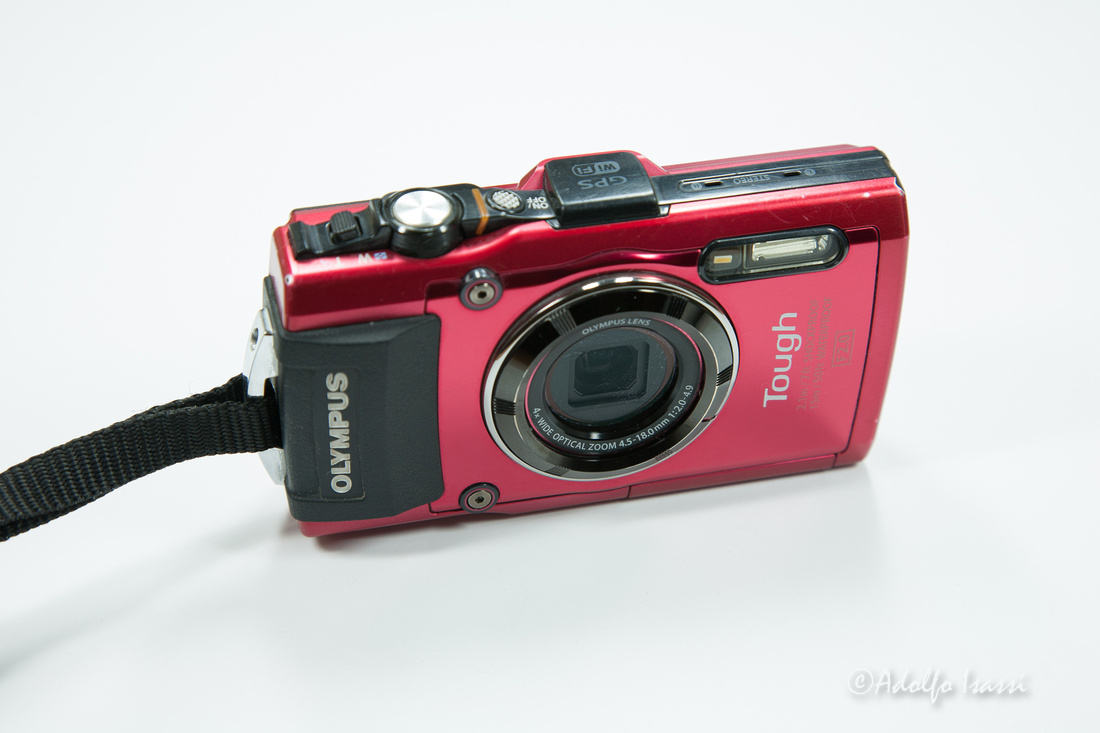
Framing & Panning: Video taken with Olympus TG-4
Another source of great inspiration and experience was my involvement with the American Canyoneering Association's efforts to produce technical "know how" videos like this one.
My involvement in the production of these videos heightened my awareness of the importance of editing and post-production to making a compelling video.
For canyoneering videos, the Olympus TG-4 has proven to be a very capable tool to record footage up to 1080p through the canyons. The main issues that I've found with the TG-4 are:
- keeping the lens from fogging up
- zooming introduces motor noise
- the camera cannot be mounted/operated hands free
Initially, I stayed away from "action cameras" like the GoPro to film sequences that require "hands-free" operation. The main reason is that it is very difficult to frame the shot. You just do not know exactly what is in and out of the frame. GoPro and other action cameras have a way to add a small LCD screen for this purpose.
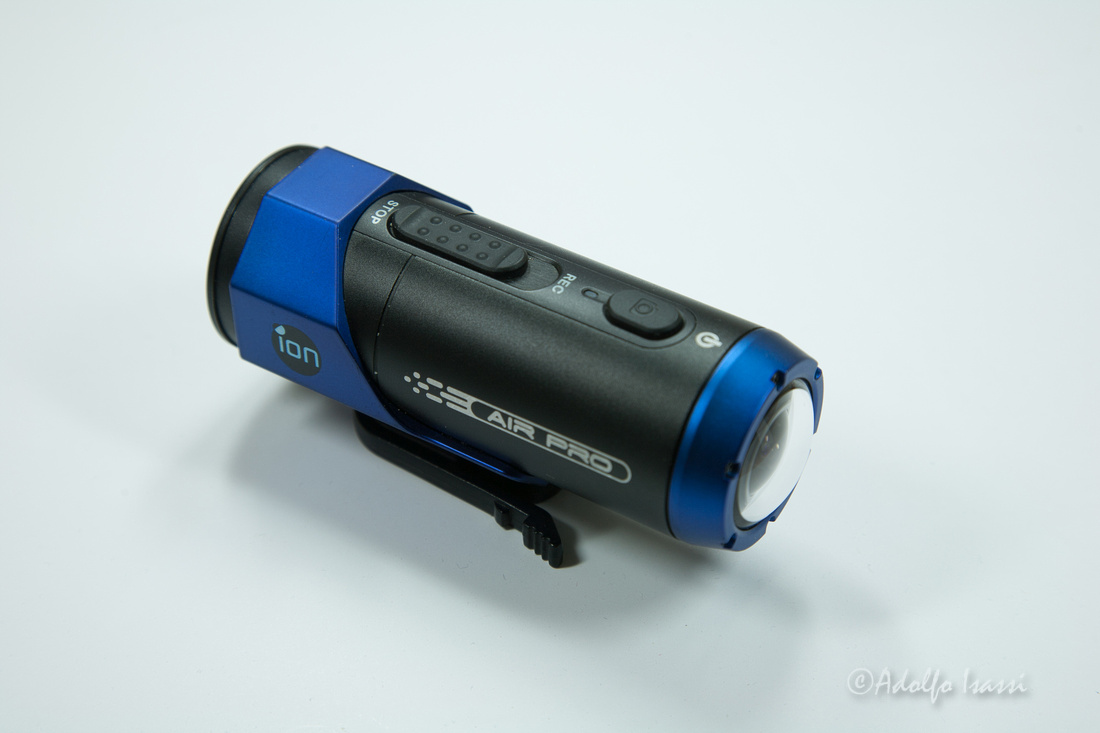
Also, the market got flooded with action cameras taking a shot at GoPro's market. Sony, Olympus, Garmin, are some of the big names that got in. One camera that got my attention was the Ion Air Pro, for the following reasons:
- It needs no extra waterproof housing.
- It can connect to iPhone to use phone's screen as a remote / framing screen.
- It uses vibration to indicate recording on/off (no there's need to confirm for that the red light is flashing).
- It has a big sliding button to record, so on/off can be operated with gloves.
- It can be held on hand steady w/o extra attachments.
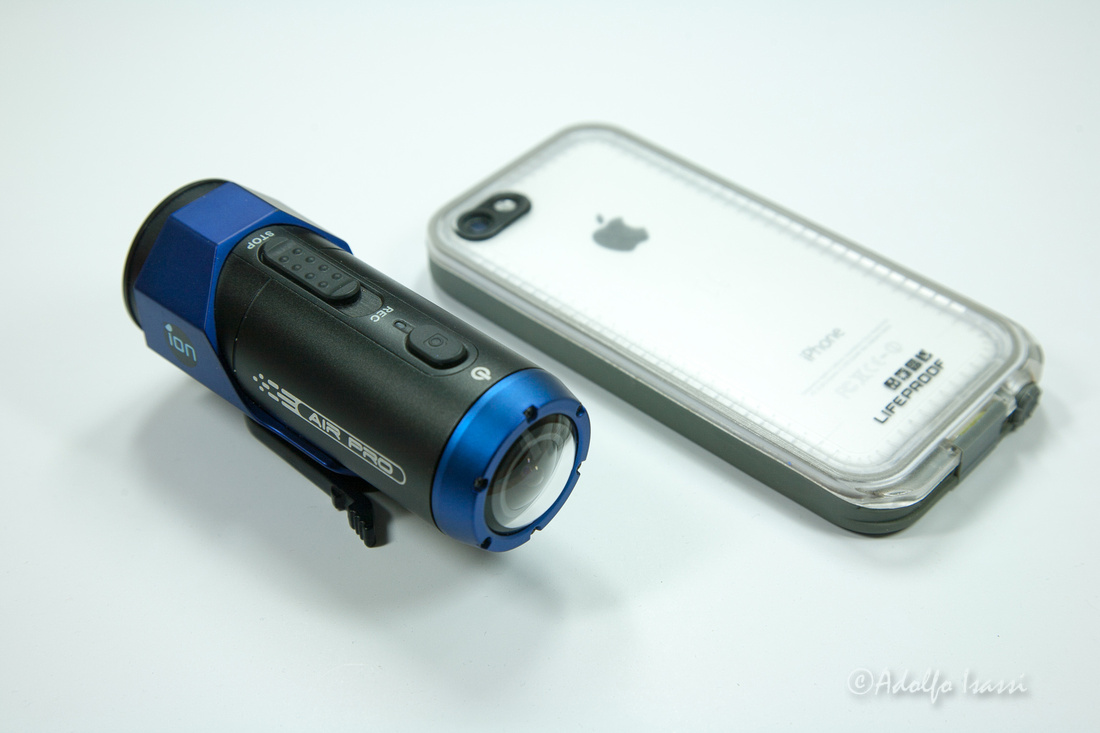
Use iPhone to operate and configure camera
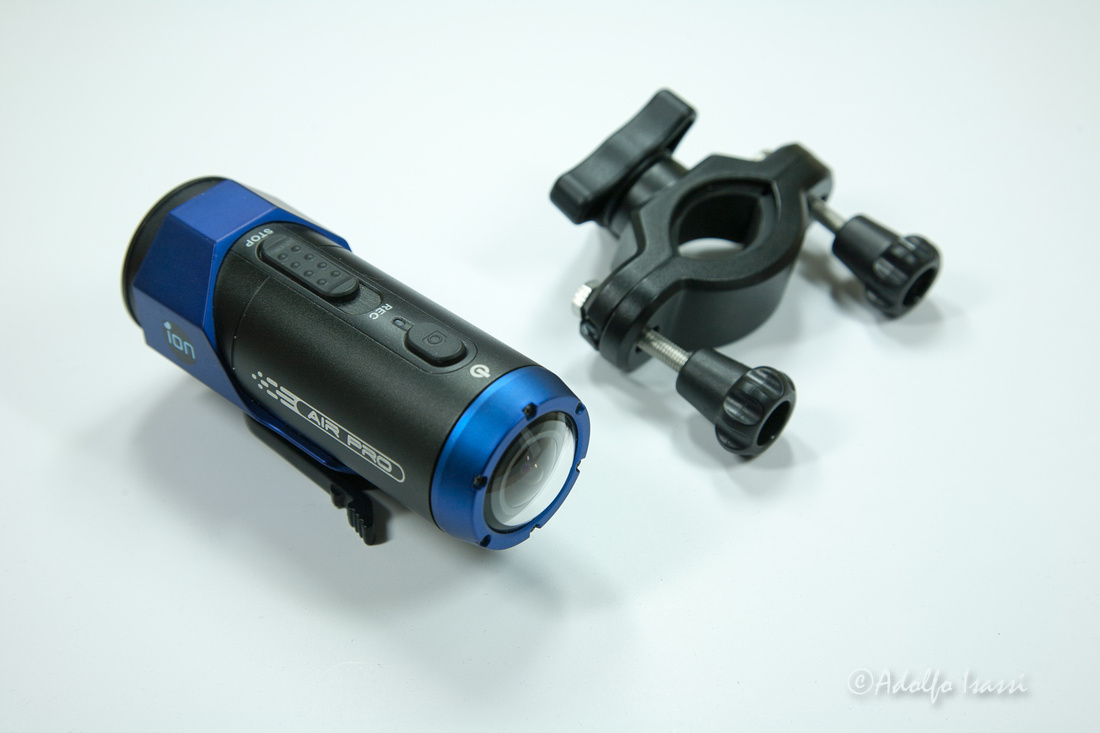
Mount on bike or hiking pole
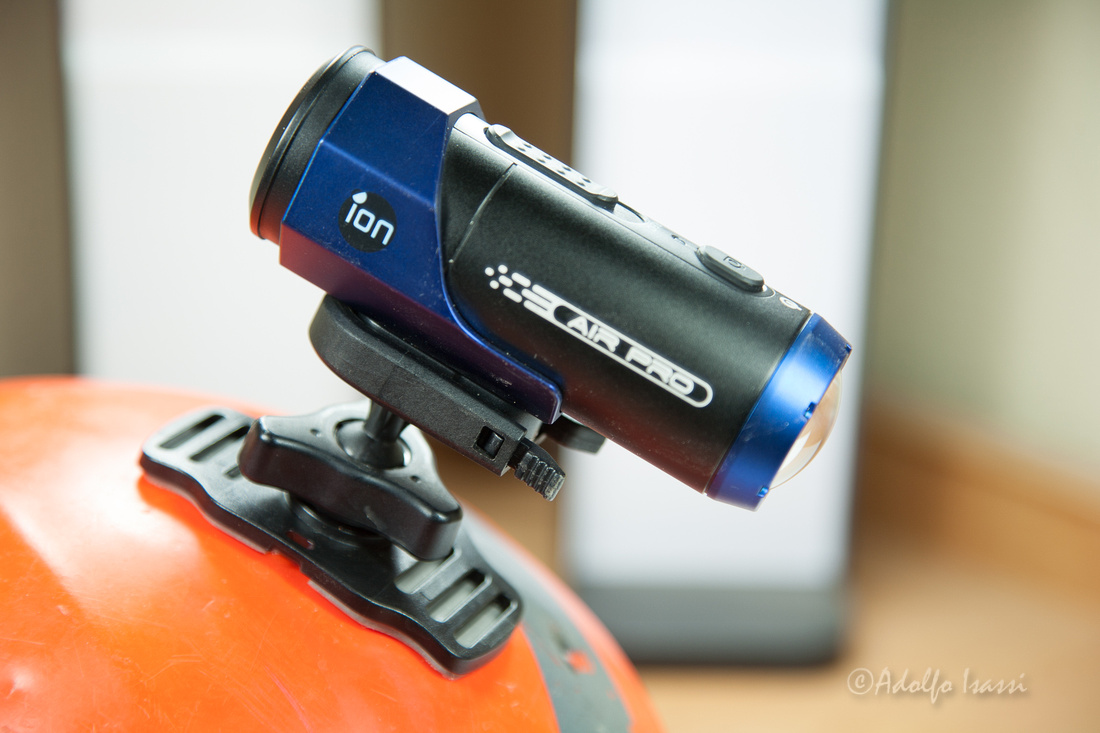
Helmet mount
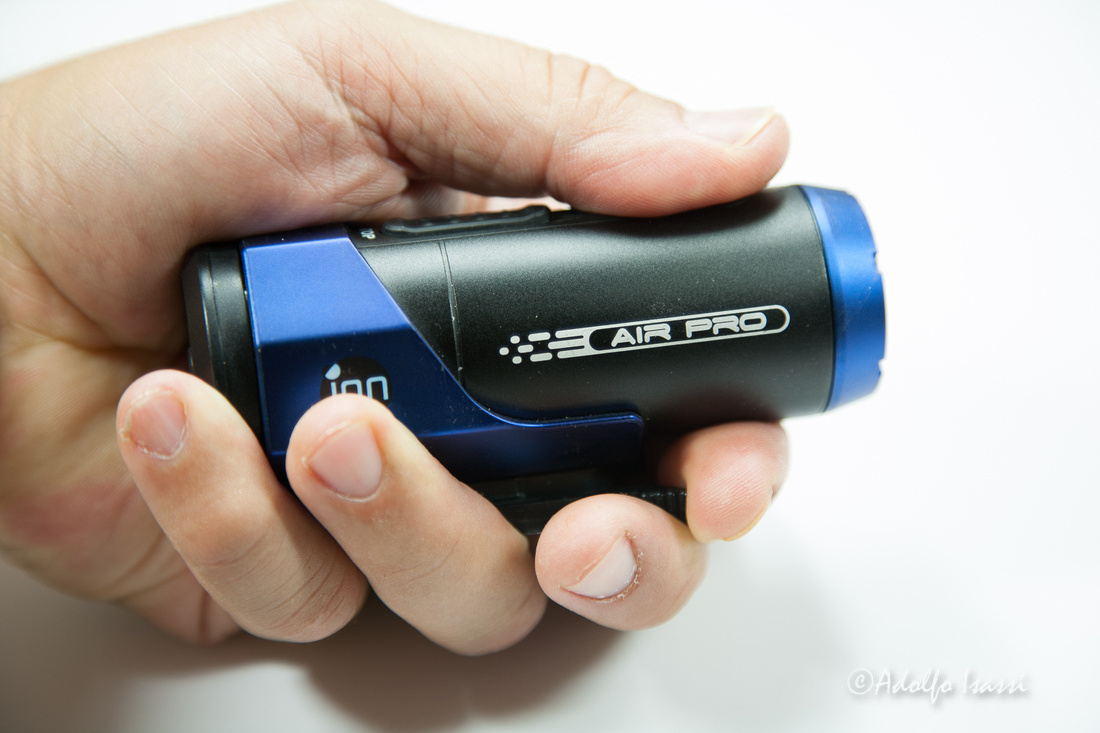
Great handling without any extra accessories
I have been using the Ion Air Pro camera for some weeks now, and I'm satisfied with the results. So far, some of the shortcomings for the Ion are:
- There's digital noise under low light.
- The curved housing for the lens does not allow camera to focus under water.
- For fast moving videos, like Mountain Biking, you need to set the camera to 720p to shoot at 60fps. If you leave it at 1080p, you will get 30fps that results in rolling shutter effects.
Video taken entirely with the Ion Air Pro camera
One other camera that I would love to test is the new Olympus TG-Tracker.