art-of-canyoneering-inspired-gear-rack

Art of Canyoneering Inspired Gear Rack

The journey from thrifty canyoneering to over-geared canyoneering, and back
-O-
"Art of Canyoneering" is the first class that I took some years ago from Rich Carlson with the American Canyoneering Academy (ACA). Canyoneering is inherently a dangerous sport. This class aimed at giving you the knowledge to identify the risks and the tools to manage and minimize them.
Selecting and acquiring gear for canyoneering seems to be a hit and miss process. Lots of choices on the market, constant evolution of available gear, intersected with personal preferences, advise from instructors, friends, videos and....blogs! :)
There seems to be a range of types of canyoneers when it comes to gear choices:
On one end of the spectrum, the "Thrifty Canyoneer":
Some canyoneers are not only reluctant to purchase costly gear but also want to get by with a minimal amount of gear through canyons. I've seen some very skilled and experienced canyoneers perform technical tasks in canyons with minimal gear. These skilled canyoneers are not thrifty canyoneers. They carry plenty of gear, they just know how to perform tasks when gear is lost, broken, or forgotten. The actual Thrifty Canyoneers do not know yet the value of owning gear that is needed in case of emergency, or they hope that others bring such gear. I started as a thrifty canyoneer, trying to do canyons with my rock-climbing gear, and nothing else.
On the other end of the spectrum, the "Over-geared Canyoneer":
The canyoneer that has an over abundance of gear hanging from the harness, and he or she gets through the canyon without using it because some of it is not necessary. I myself, moved from a thrifty canyoneer to an over-geared canyonner, trying to match a piece of gear for every possible eventuality.
Finding a balance is an evolving process:
In all fairness, I think that there is a natural progression curve in which people start as thrifty canyoneers and move towards over-geared canyoneers, and finally dial down their gear to a personal, reasonable middle point.
Knowing what gear works best for you, what gear to bring depending on the canyon ACA rating, and what rescue techniques may be necessary in case of a mishap, takes training, experience, and willingness to experiment with different gear. It is a process that at some point feels like an art.
The Art of Canyoneering class approach was to let you choose your tools while exposing you to a range of choices, underlining that the important aspect, was not the particular tool or piece of gear, but the principle behind the usage and application of it. I've seen other more prescribed and dogmatic approaches towards gear selection, which makes teaching a simpler, faster process. Not sure what way is best. I guess as long as you know how to perform the necessary tasks safely and with a reasonable range of available tools, it's OK.
On the pragmatic side of canyoneering, let's face it, some of the routes out there are brutal, you do not want to carry extra gear that is not useful, and you want it to be as light as possible. Art of Canyoneering focused on how to select gear that could perform several functions on its own or combined with other pieces of gear: Multifunction gear.
This is the backstory behind my current canyoneering gear rack. I think is still evolving, as my skills evolve, I engage different type of canyons and gear choices also change and evolve.
As part of the ACA, sometimes I engage in leading canyons or practice sessions, and gear issues or questions come around. So I will go through my current gear and see if the selection behind it helps you in the selection of yours.
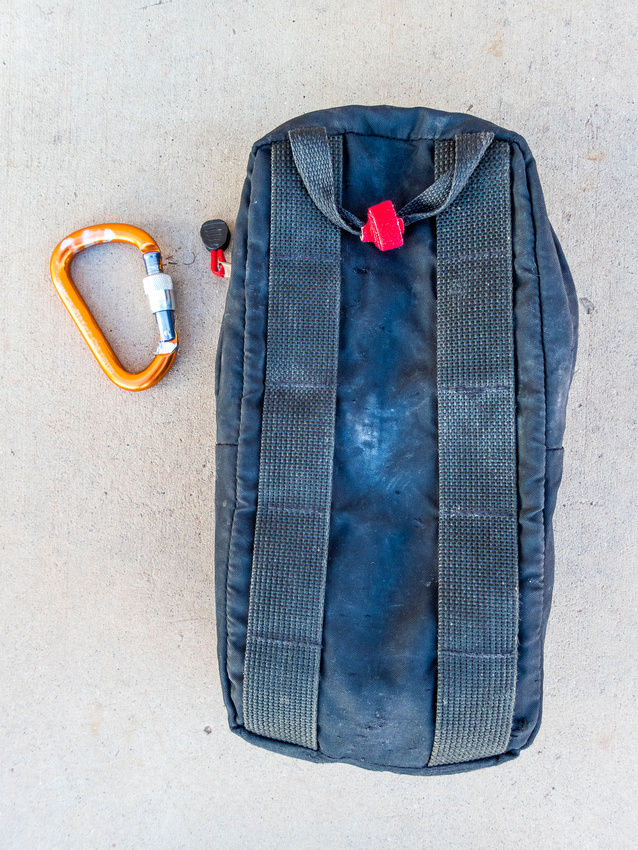
Everything that you will see in the next photographs, fits in this bag. This bag uses a fraction of my 45L standard canyoneering bag , and leaves room for a wetsuit, harness, helmet, up to 300' of 8mm rope, First Aid Kit, water, and food. Sometimes, this includes a small packraft. So, the point is, this bag size is not an issue. Even in small skinny canyons, this bag will fit in a 15L bag with all gear required for such a canyon. The bag is organized in a way where the items that are used the least, are at the bottom, and the items that are used the most, are at the top.
Bag from Top to Bottom
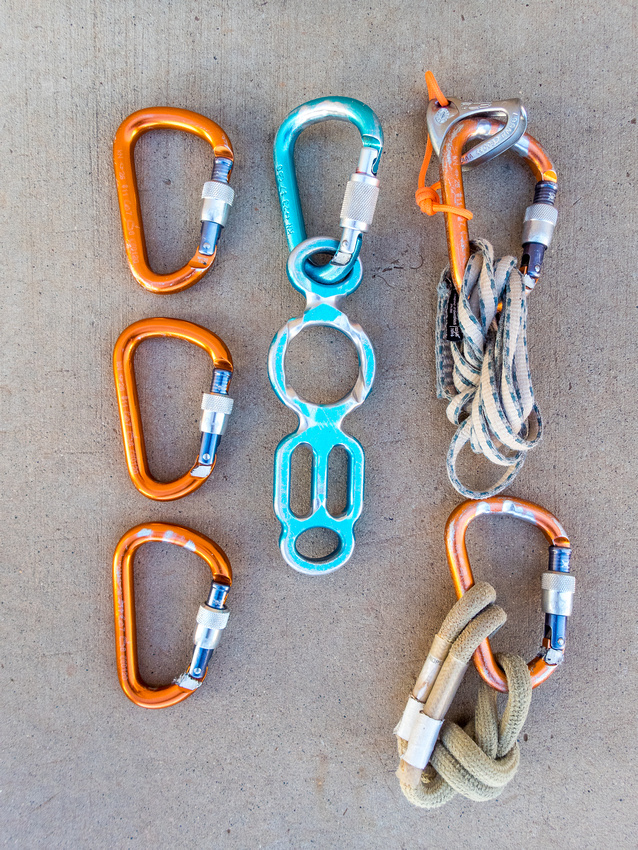
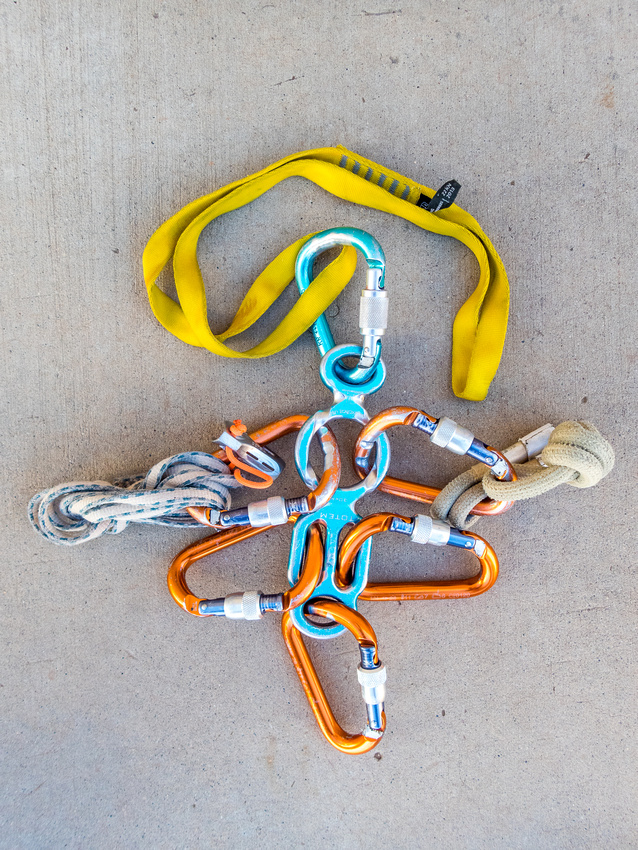
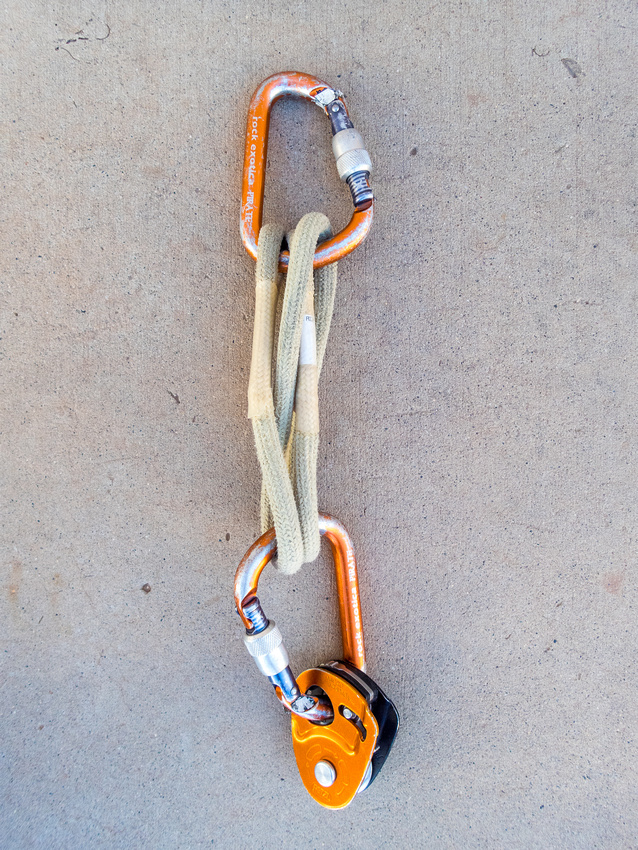
I call this, the "Totem Rack". It is at the top of the bag, and is the first thing that I pull racked like this:
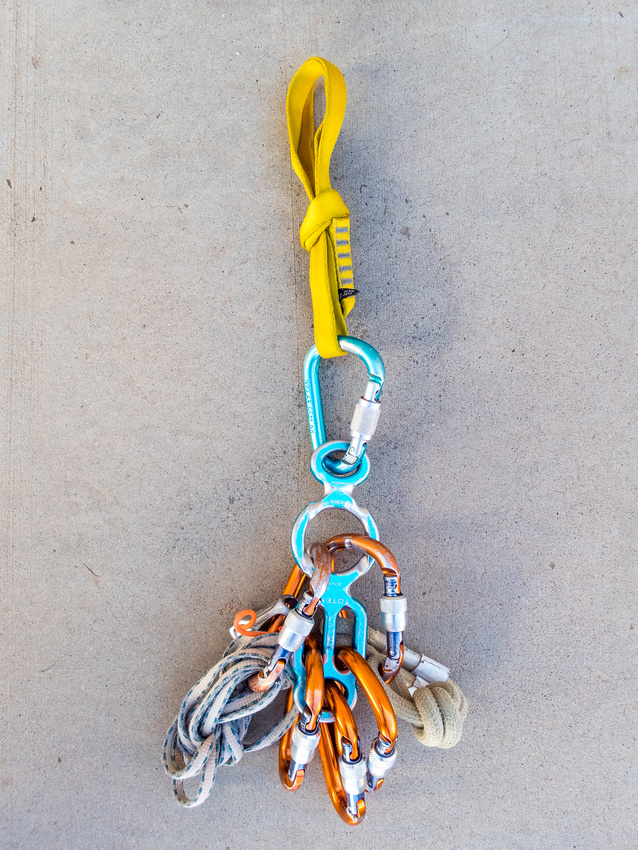
With what you see in this photo, you can:
- Rappel single or double stranded
- Rappel with a self-belay above, or below the rappel device.
- Rappel double without twisting the ropes, to have a clean pull.
- Rig static single or twin rope systems
- Rig contingency/releasable single or twin systems
- Rig Rig contingency/releasable single or twin systems + a top-rope belay
- Convert to haul on the fly
- Rappel down and pass a knot
- Rig a guided-rappel
- Perform basic self-rescue
- Ascend rope
- Ascent a tensioned tope
- Descend a tensioned rope
- Perform rescue conversion from static to lower on single rope, double rope or "tails up".
- Install a Dead-Man-Switch
- Install a Canyon-Quick-Draw
- Install a retrievable safety line
- Rap pack hanging and leave your safety tether free for self-rescue.
- Perform rescue pick-off with up to 3:1 mechanical advantage
Next gear out of the bag in case I need to:
- ascend a long way (Microtraxion)
- ascend and pass a lip on the rock, or a knot in the rope
- perform a rescue by converting to a haul system
- haul with mechanical advantage up to 5:1 complex (combined with initial base gear)
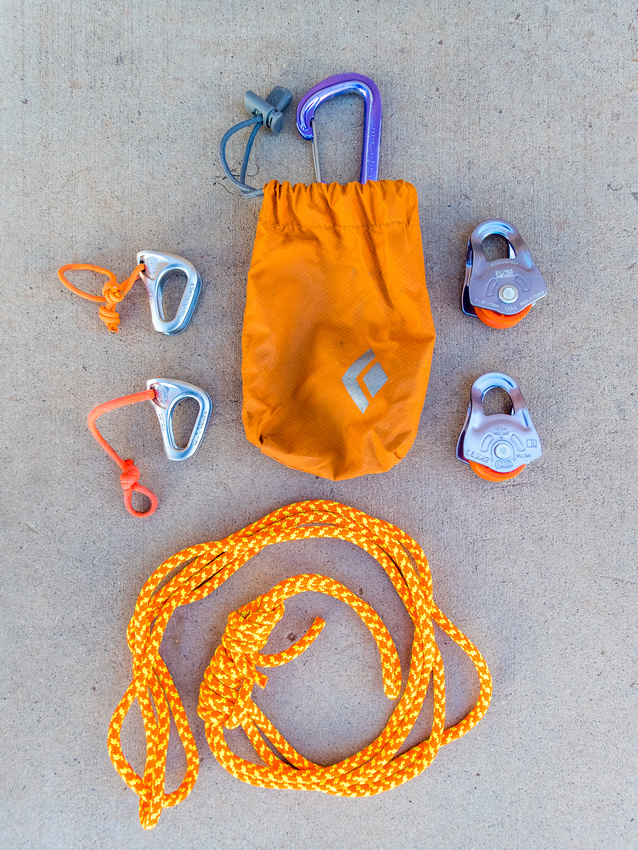
Next gear out of the bag in case I need:
- to install a mechanical advantage in a haul system that exceeds a 5:1 complex
- install a system to tension rope that requires self-minding pulleys to protect the rope sheath.
- to perform a rescue Pick-Off where I may need 5:1 mechanical advantage
- a foot loop that cinches on my foot (long Purcell Prusik. Sometimes a shorter version in my harness as a safety tether)
Bottom of the bag:
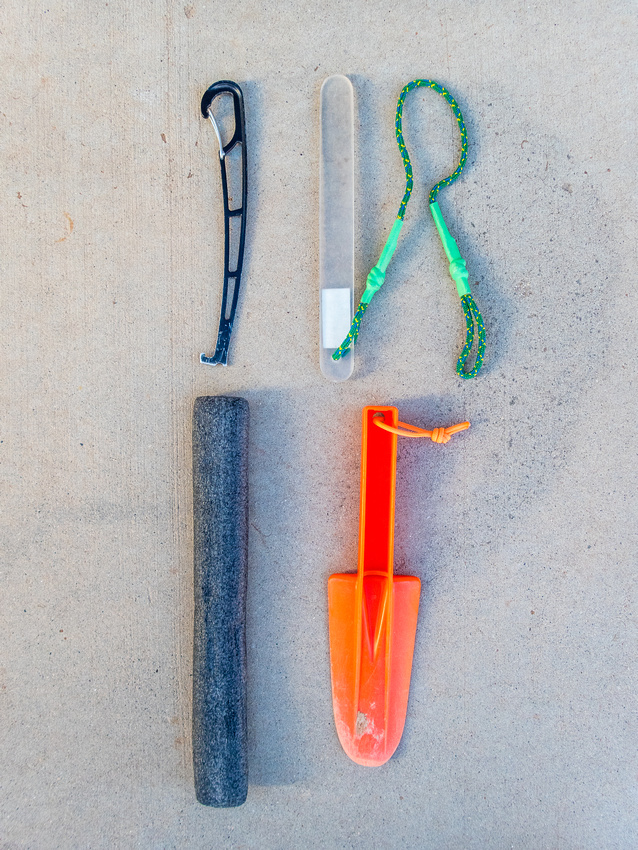
Anchor building bits:
- A crack cleaning/nut tool to clean cracks and pinch points. That tool can also check bolt heads. This tool can be used also to loosen tight knots after heavy loading.
- A "fiddle stick" for emergencies (like running out of webbing), very tricky rope pulls. Not an every day tool for me.
- A piece of pipe insulation for rope-edge-protection
- A shovel to dig dead-man anchors and fill potshots or sand-traps.
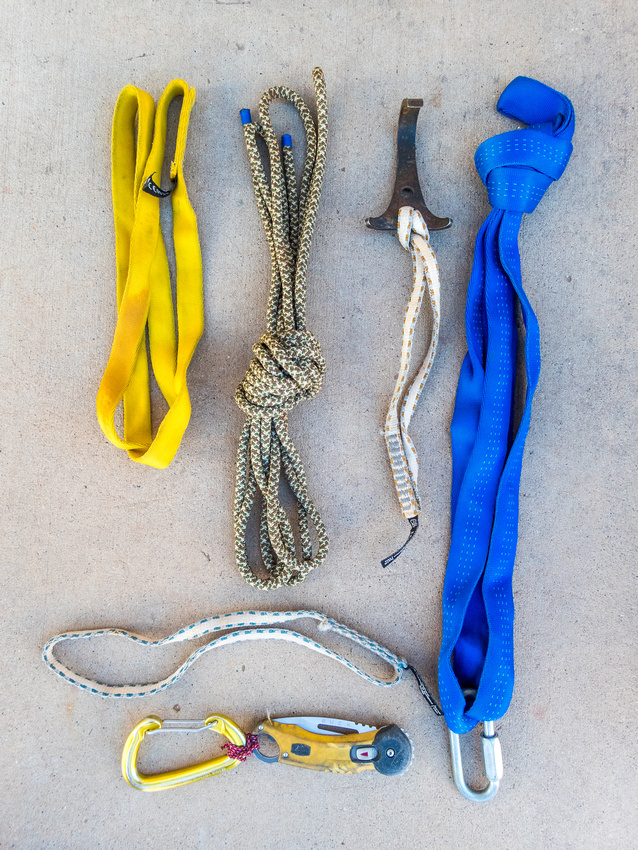
Rigging odds and ends that help.
- Webbing and rapide to build a "piggy back anchor" sometimes helpful is rescue scenarios
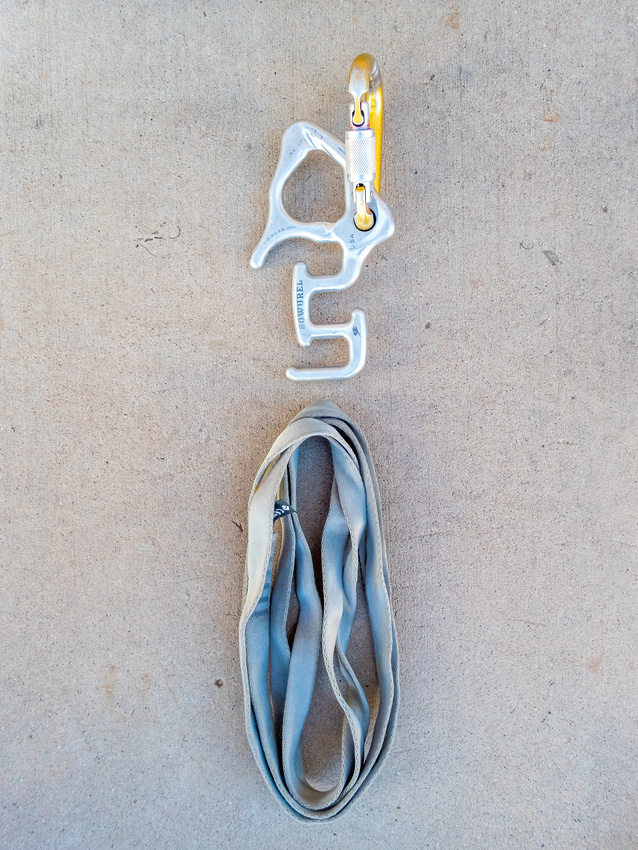
- Grappler hook for drops where LAMR was meat anchor (rarely used, but has saved me a couple of times)
- Short runners to extend master points in rigging scenarios.
- Accessory cord for more rescue tricks, repairs, emergencies
- Self locking knife for hard to cut webbing, cord, rope (I have a Trilobite EEZYCUT on my harness)
Depending on the particular canyon:
For 200+ overhang rappels on a skinny 8mm rope, I switch to a rack-inspired rappel device with which I can fine tune friction on the fly. Sometimes a double runner to rig a chest harness if needed.
Some notes:
The gear depicted in this post, is my personal selection and not an advertisement on the brands. The gear selection also reflects the type of canyons that I descend often in the American Southwest. The important concept is that the gear that you select, performs the often needed canyoneering tasks, the emergency canyoneering tasks, in the type of canyons that you descent.